Getting started playing disc golf is super easy, but there are a few things I can tell you that will make your first outing feel and look like you’re a natural. This is my ultimate beginner’s guide and cover’s all the essentials. Everything you absolutely need to know to get you started if you’re brand new to disc golf.
Here’s an overview of what this guide cover’s. Feel free to jump to the section that interests you most or just start from the beginning (which is what I recommend!)
How To Play Disc Golf
We’re going to start with the basics… This is a guide for beginners after all. So let’s get the easy stuff out of the way first. What is disc golf, and how do you play it?
From a beginner’s standpoint, you can think of disc golf as a game created by combining traditional ball golf and the throwing of specialized frisbees. Just remove the golf clubs and golf balls, and replace them with a bag full of plastic discs. What you’re left with is the game of disc golf!
Many of the same terms and rules apply to both traditional ball golf and disc golf. For instance, the score is counted the same way, where one throw equals one stroke. Each hole has a par (which is the amount of strokes, or throws, it should take to finish the hole), and the goal is to shoot at or lower than par. Shooting par on every hole keeps your score at 0. Any strokes above par are counted as +1 and any strokes below par are counted as -1. For instance, if it took you 4 throws to make the disc in the basket on the first hole, and that hole is a par 3, then your score is +1 (pronounced “plus one).
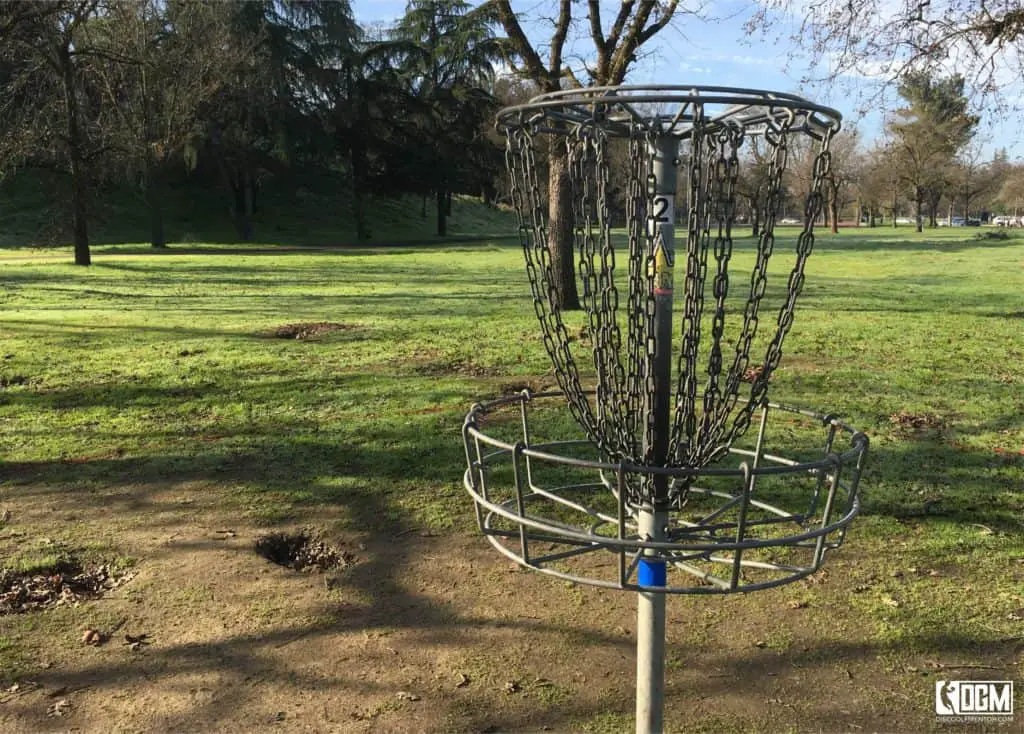
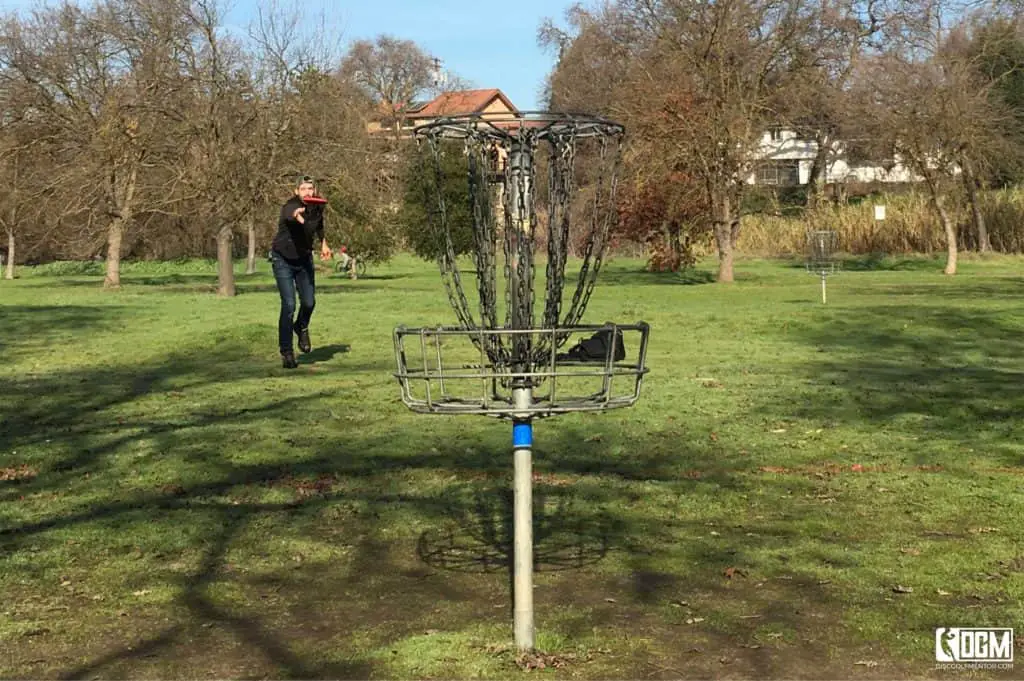
The goal of the game is to throw a disc from the tee pad toward the basket, then keep shooting until you make your disc into the basket. Once you’ve thrown your disc into the basket, you’ve completed the hole. Count your score and move onto the next hole. You’ll keep going like this until you’ve played all the holes on the course, which is typically 18 holes, just like traditional ball golf. If you’re playing as part of a group, the person with the lowest score wins.
What Are The Disc Types
In traditional ball golf, there are different types of clubs and you use those clubs for different purposes. For instance, drivers are meant for hitting the ball long distances off the tee. Fairway drivers still shoot long, just not as long as the distance drivers and can be used on the fairway. Then you’ve got your irons which are meant for a wide range of middle length shots, and finally the putter which is used for putting.
Disc golf is very similar to ball golf in this regard. There are discs meant for distance driving, fairway driving, and putting. There are also mid-range discs which are like the irons in traditional ball golf and are used for a wide variety of middle length shots.
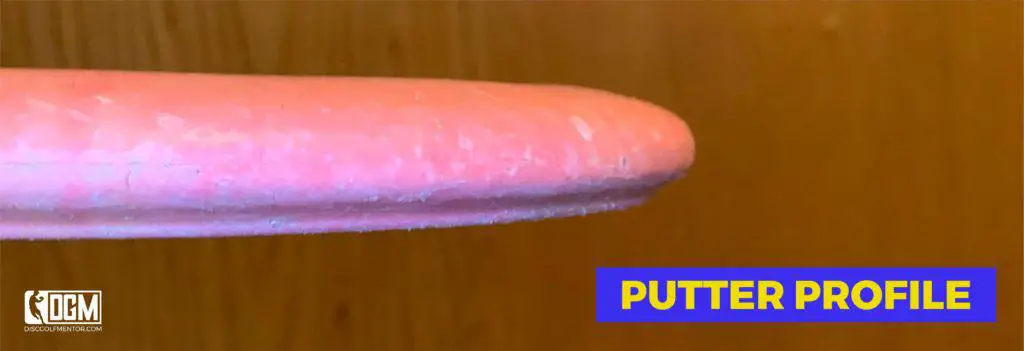
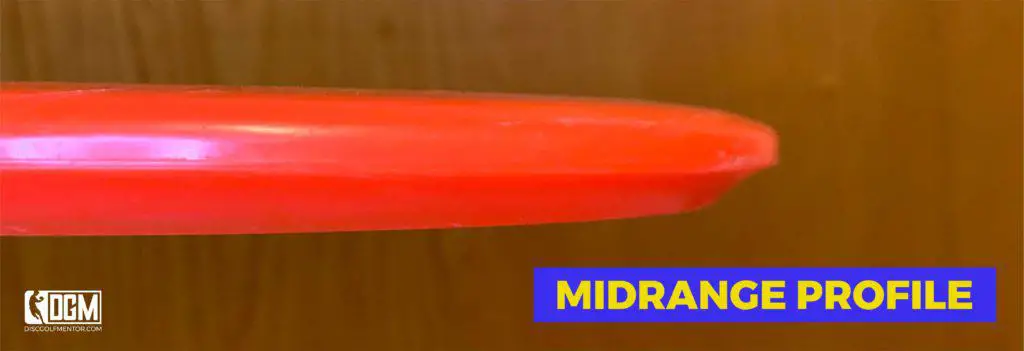

You’ll find that the different types of discs will look quite different from each other. For instance, discs meant for distance driving off the tee pad are typically very flat with a wide rim which helps with wind resistance and speed, whereas putters tend to be deeper and stockier with a very thick rim.
This holds true for mid-ranges and fairway drivers as well with fairway drivers resembling distance drivers quite a lot and mid-range discs falling right in the middle.
What is a Disc Golf Disc Made Of?
One of the most common questions beginner’s have is: What are disc golf discs made of?
Disc golf discs are made of plastic and each manufacturer has their own blends of plastic that they use for their discs. In fact, all disc makers have several different types of plastic that they offer, each with unique qualities that will change the way the disc looks, feels, flies and how durable it is.
As an example, the disc manufacturer Innova sells a disc called The Destroyer. It’s a very popular distance driver and Innova offers this disc in many different plastics. The GStar plastic is one of their least expensive plastics, but it’s also one of their least durable. GStar plastic degrades fairly quickly, but you can also buy The Destroyer in Innova’s Champion plastic which is a bit more expensive but holds up to damage much better.
There are many different types of plastics for each manufacturer and each has positives and negatives in terms of price, durability, feel and flight characteristics.
You may even find that the same disc will fly differently if it’s made from a different plastic. Using the Destroyer example above, many seasoned players have come to find that The Destroyer made from the Star plastic seems to fly the best.
You’ll most likely develop your favorites among the different types of plastics as you play. As a beginner, I recommend throwing the least expensive of the plastic types for any disc you’re interested in trying out. Chances are that you’ll be trying many different discs and you don’t want to waste money on very durable plastic for a disc that you may end up not liking very much. Once you find the discs you like, then you can upgrade to the best plastic.
What Weight Disc Golf Discs Should I Throw?
Disc golf discs come in different weights, usually ranging between 140 and 180 grams. Lighter weight discs will fly further than their heavier counterparts, but are also more easily affected by the wind. Heavier discs may fly a little slower and for slightly less distance, but tend to be more stable, especially in a head wind.
For beginners, I recommend going with a mid to light weight disc. Somewhere in the 155 to 165 grams range. Lighter discs tend to a be a bit easier to throw and so you should see better distance from the disc even as a beginner.
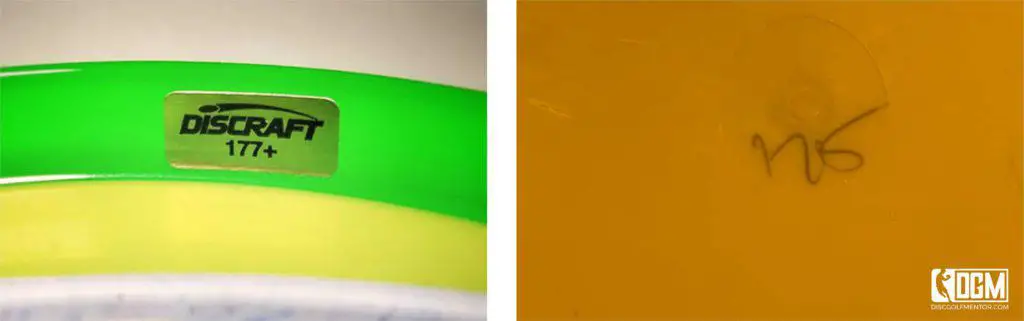
When you purchase a disc online, you’ll be able to select a weight range. In person, you can find the discs’ weight listed on the bottom of the disc. Depending on the brand, there will sometimes be a small sticker on the bottom of the disc that will list the weight. In many cases though, the weight will be imprinted or written on the bottom of the disc.
What Are Disc Flight Ratings?
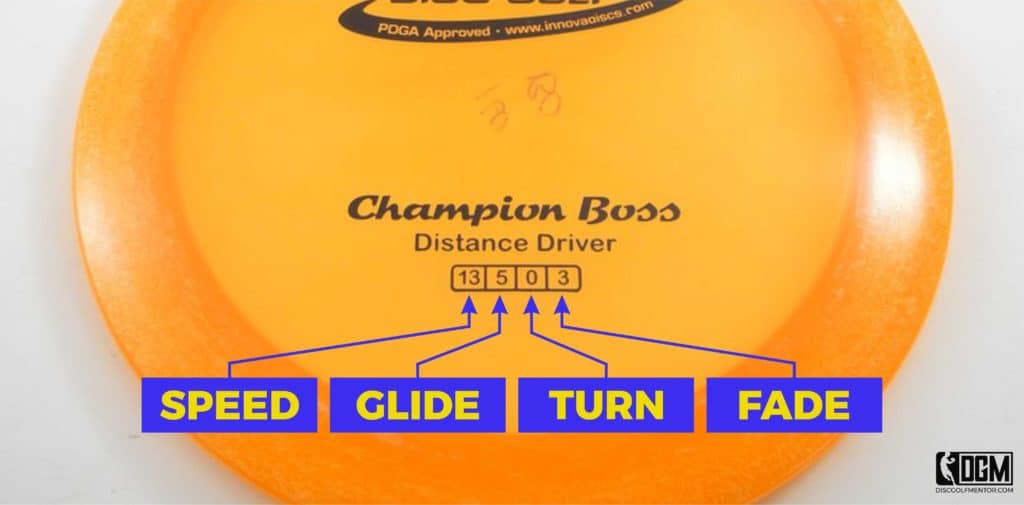
One of the first things beginners to disc golf notice is that there are numbers on the front of most discs and it’s common to ask what the numbers mean. These are the flight ratings of the disc. Each disc manufacturer does things a little bit differently, but in most cases there are four numbers and they go in order like this:
- First Number = Speed
- Second Number = Glide
- Third Number = Turn
- Fourth Number = Fade
Speed
The speed of the disc is a very misunderstood number. Most beginners (including me for quite some time) think that the higher the speed rating is, the faster (and farther) it will fly.
Unfortunately, this is incorrect. The speed rating actually refers to how much speed the disc can handle and still maintain it’s stability. For example, if you’ve got a really fast arm, and you’ve grabbed a disc that can’t handle that much speed, the disc may loose it’s stability and fly in a way that it isn’t intended to fly. Essentially, it can make the disc fly unpredictably.
Ideally, you want to throw a disc with a speed rating matching your arm speed. That way, the disc always flies the way it’s intended to fly, which means you’ll have a much more predictable flight path.
The question then becomes, what is my arm speed? There’s no rock solid way of knowing your arm speed but I’ve found that this is a really good rule of thumb:
If you throw a disc, and the disc immediately fades (cuts to the ground in the direction opposite the spin), you’re probably throwing a disc that’s too fast for you and you need to disc down (switch to a disc with a lower speed rating). If you throw a different disc, but this time the disc turns over (turns in the direction of the spin), then you’re probably throwing a disc that’s too slow for your arm and you should disc up (throw a disc with a higher speed).
Ideally, when you throw the disc should stay fairly level and gently fade, or turn then fade (except with extremely overstable and understable discs). If this is the flight path you’re getting, then you’re at the right speed.
Glide
The second number on the disc is the disc’s glide rating. The glide rating is pretty self explanatory. The higher the number, the more the disc has a tendency to stay aloft, while a lower glide rating means the disc will have a tendency to drop more quickly.
High glide discs are nice because they tend to fly further, even with less power behind them, although, high glide discs can also be a bit less stable so they can fly off course more easily.
Turn
The turn rating of the disc describes the disc’s resistance to turnover at high speed. A disc with a high turn rating will resist banking in the direction of the spin. A low or negative rating means the disc is more likely to bank in the direction of the spin. For right handed players who throw backhand, this is a right turn.
This turning typically happens in the first phase of flight and is always followed by the fade. The lower the turn rating, the more aggressive the turn will be. If you pair a low turn with a high fade, you get a disc that will curve one way, then come back on an S line.
Fade
The fade rating describes the last phase of flight and refers to the discs tendency to curve, or hook, as it starts to spin more slowly. A higher fade rating means more curve and a lower fade rating means little to no curve at the end of the flight. For right handed players throwing backhand, this is a left curve.
If you’re looking for a disc that flies very straight, look for a disc with a very low fade rating. If you want a disc that hooks a lot (these are great for throwing around obstacles like trees), look for a disc with a high fade rating.
What Is Disc Stability?
The last two flight ratings (turn and fade) are what’s taken into account in determine the discs stability. In general terms, all discs fall into 3 stability categories: understable, Stable, and overstable.
Understable
Under stable discs tend to have a very low or negative turn rating, which means that at higher speeds they almost always turn over, or if throwing right hand backhand, they’ll bank to the right.
Stable
Stable discs tend to fly very straight with little to no fade at the end of the flight path. A truly stable disc will fly straight with no fade at all.
Overstable
Overstable discs tend to have high fade ratings and will always hook to the left. Overstable discs tend to be really great in windy conditions as they fight the urge to flip over.
Knowing a discs stability is great for us because it allows us to know in general terms how a disc will fly without having to really read and understand the discs flight ratings. Most understable discs fly in a similar way. The same is true for stable and overstable discs. For example, when I grab an overstable disc, no matter which one it is, I know that it’s going to fly like most other overstable discs.
Of course there are degrees of overstability. Knowing what the flight ratings mean is a great way of knowing the degree of stability the disc will have.
How To Hold (or Grip) The Disc
Before we get into the mechanics of the throw itself, let’s go over how you should hold the disc.
In disc golf, there are a bunch of different grips, or ways to hold the disc, and most are specific to the type of throw you’re trying to accomplish. For backhand and forehand shots, there are 3 main grips I’m going to be showing you. There are more, which I talk about in my Grip Guide, and once you progress past the beginner stage, I definitely think you should check those out! But for now, let’s focus on these three:
Backhand Power Grip
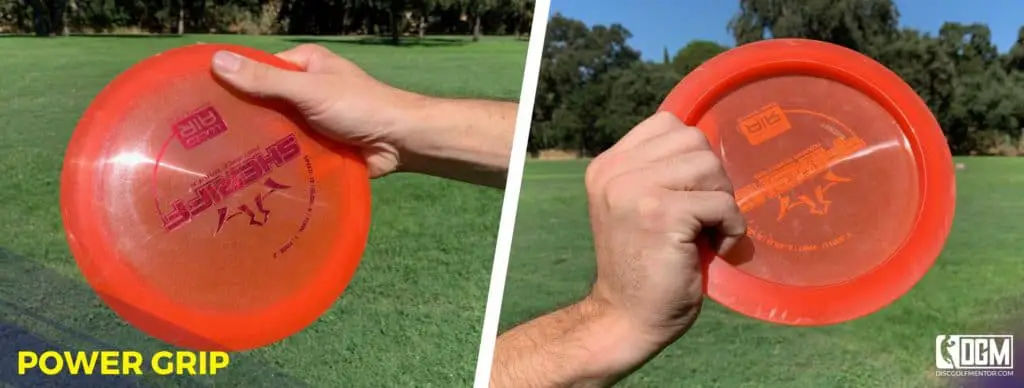
I recommend using the power grip for backhand if you’re throwing a distance or fairway driver. This is a very solid grip that allows your to keep a firm hold on the disc which is very important. As you spin, you generate a lot of torque and you don’t want the disc flying out too early.
To use the power grip, place the disc with the edge nestled in the meat of your palm with your thumb on the top of the disc and your fingers curled around the bottom edge. Your fingers should curl around the lip with the tips set inside the rim of the bottom of the disc. Hold the disc firmly but not too tight and keep your wrist straight and loose as you throw.
Backhand Fan Grip
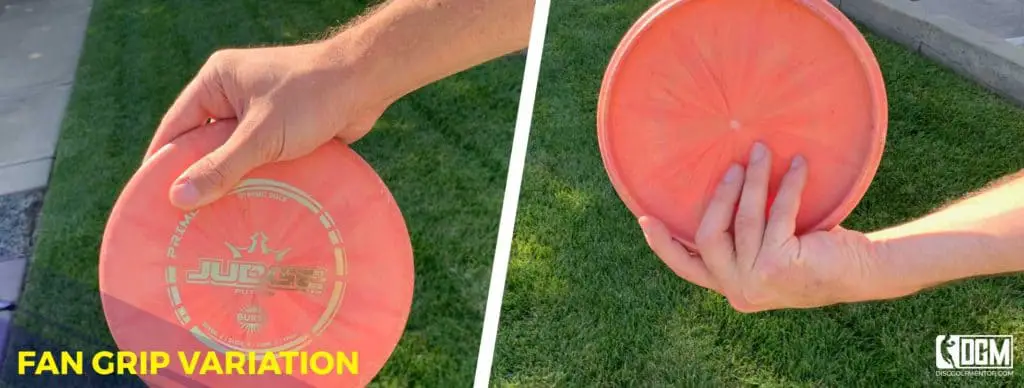
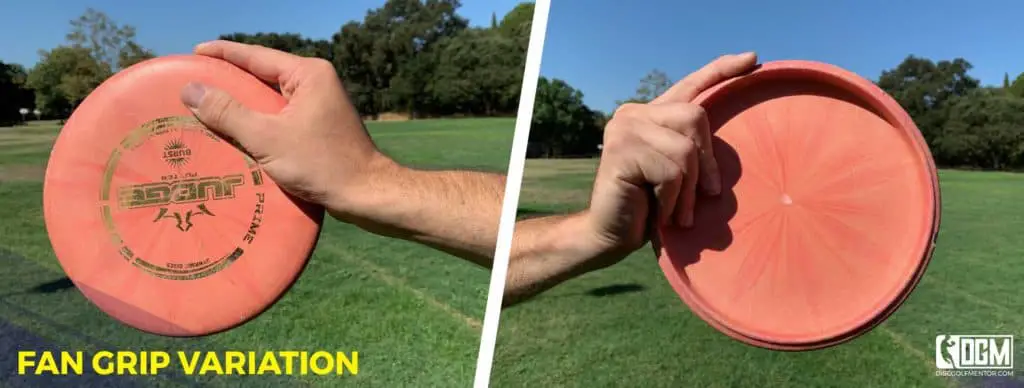
The fan grip should be used for approach shots and putting as it adds a degree of sensitivity and accuracy to your shot.
To use the fan grip, hold the disc in your dominant hand with your fingers splayed out on the bottom of the disc. Your index finger should be resting along the outside edge of the disc for added support, which also gives you more control.
Forehand Stacked Grip
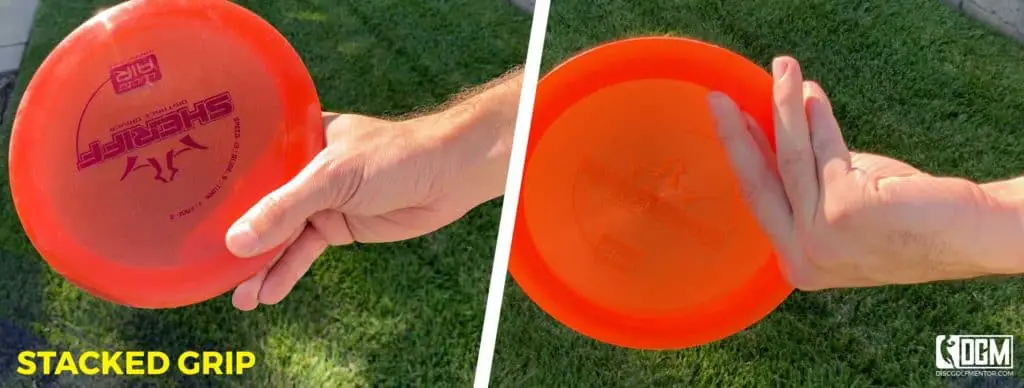
The stacked grip is a solid forehand grip, good for both power and accuracy. With this grip, you can feel confident in putting more power into your throw without loosing too much control over where the disc is going to fly. It’s a very well balanced grip, which makes it great for beginner’s learning to throw forehand.
To perform the stacked grip, hold the disc with your thumb on the top flight plate and your forefinger and middle finger stacked atop one another on the bottom of the flight plate and resting on the inside lip of the disc. The ring finger and middle finger stay on the outside lip of the disc for support.
There Are Many More Grips!
When you’re ready to progress past the beginner level, head on over to my Grip Guide where you find a lot more information on all the different types of grips and how to use them!
How To Throw The Disc
In this next section, I’m going to teach you the techniques involved in throwing the disc itself. I’ll do my best to describe the basics for you, but keep in mind that no amount of reading (at least for beginners) is a substitute for practice. The best way to learn to throw a disc golf disc is to learn the basics, then get out there and practice.
So that’s the aim of this part of the guide. To teach you the basics of correct form. That way, you’re developing good form as you go, instead of stumbling through the early stages of the game and developing bad form. Come back to this post often and reference the form videos I’ve included below to make sure that you’re developing good form.
Two Main Throwing Styles
In disc golf, there are two main ways to throw your disc. Backhand, and forehand (also called sidearm). Throwing backhand looks similar to how you’ve probably thrown a frisbee at your local park. This is the more traditional and most popular way to throw. Forehand is similar to throwing a baseball, except the disc is thrown out to the side of your body instead of overhead.
Beginner’s may find that one style is easier to learn than the other. Remember that you don’t have to learn to throw both ways. My recommendation for all beginners is to try both methods and see which you like best. The bottom line is that either of these two styles of throwing a disc is perfectly acceptable for beginners, so we’ll be covering both.
The Backhand Throw
Throwing backhand is the most common way to throw a disc golf disc. This throwing style will almost always fade left if you’re a right handed player and you’ll typically generate more power with a backhand throw vs a forehand throw. This means that a backhand throw has the potential to go further than a forehand throw.
To teach you the way I throw backhand, I’ll break down the mechanics into two sections: lower body and upper body.
Backhand Lower Body Mechanics
If you watch professional disc golfers throw backhand, you’ll see that most of them have the same footwork as they throw. This footwork is called the X Step, and is generally accepted as the best form when throwing backhand. The X Step helps to align the body in the best way to generate the most power into your throw while keeping you balanced. This means power + accuracy.
The X Step. Here’s how to do it:
Begin the X Step at the back of the tee pad, facing the target. I start by stepping with my left foot while turning slightly.
Next comes a step with the right foot, while turning a bit more. (Note that at this point you should be turned sideways so that your leading shoulder is facing the target.)
The third step is where the name “X Step” comes from. Cross your left foot behind your right.
The final step is your “plant foot” or your “brace”“. This should be a long step onto the ball of your right foot with the heel off the ground and facing toward the target. This forces your hips to be in a rotated position. As you turn to throw, your heel comes down, your plant foot rotates around on your heel, your hips turn and then your body turns. All of this happens in a chain that generates a lot of kinetic energy and moves it all into your throwing arm resulting in massive speed and distance!
Backhand Upper Body Mechanics
Firstly, lets remind ourselves that how we hold the disc is important. Choose one of the grips from earlier in this article to use as you throw this shot. I recommend starting with a fan grip if your throwing either a putter or mid range, or the power grip if you’re throwing a driver.
During the first few steps of the X Step, you just want to keep the disc in front of you and level with your elbow high. When you hit the final step, as you reach your right foot forward, you should start reaching your disc back in a straight line opposite the target.
Important: It’s important that you keep the disc back in a straight line, and not curved back behind your body. When you the disc follows a curved path during the throw it greatly decreases power and accuracy. This is called rounding and it’s one of the biggest mistakes beginners make.
If you’ve noticed that you’re rounding, I have a great guide on how to fix it here: How to Fix Rounding
You want your disc to be all the way back with your upper body rotated so that you’re almost facing behind you. For a split second you’ll loose sight of your target as you twist your upper body backward. This is okay and you’ll get used to it.
As your plant foot hits the ground, you twist your hips and start to pull the disc towards the basket. Keep the disc very close to your chest and remember to pull in a straight line. The disc should whip out of your hand as you fully extend your arm. Your following arm will come all the way around and across your body as you rotate and stop.
The Forehand Throw
The forehand throw is the second most used type of throw in disc golf and is mostly used when you need to make the disc curve in the opposite direction of your backhand throw. For instance, If you’re a right handed player, when you throw backhand your disc will almost always curve left. This can be troublesome if the hole you’re on curves right instead. This is when you would use your forehand throw.
Of course, the forehand throw isn’t only used as a utility throw to curve the disc a certain way. It’s also the preferred way to throw for many players. Forehand throws tend to be very accurate and are also great for low ceiling shots. It’s a great shot to learn.
Before we begin, remember the grip I showed you above? I recommend the stacked grip when throwing forehand. Be sure to reference the photo to make sure you’re holding the disc the right way.
Forehand Lower Body Mechanics
When throwing forehand, I like to start a little bit lower in my stance. If you’re right handed like me, you’ll start by facing the target with your feet fairly close together. Make sure your in a balanced position with your weight centered over your hips.
Begin by shifting your weight forward and stepping out with your right foot. At this point you should begin to turn your body to the right. Next comes the left foot as you turn your body more to the left. At this point your left should (right shoulder if you’re a lefty), should be facing the target. Then comes a bit of a hop off your left foot as your right foot comes to land where your left foot was just placed.
The last step is your left foot coming down hard and planting as you finally turn your hips and pull through. This last step is a very long step and make sure that you stay low in your stance as you go through the motions.
Forehand Upper Body Mechanics
As your start your throw, begin by cocking your arm back, almost like you’re going to throw a baseball. The wrist should be back with the disc almost touching the back of your forearm. The disc will stay in this position until your final step. As you come into that final step and your rotating your hips, open your chest wide and rotate your upper body, which brings your throwing arm around.
Lead with your elbow and keep your elbow as close to your body as possible. Keep the disc level to the ground as you pull the disc through. At the last moment, flick your wrist towards the target and let the disk fly out of your grip.
It’s important to keep your thumb pointed to the sky throughout the entire follow through so that you don’t rotate your palm down and cause the disc to turn over. If you want the disc to come out flat, keep your thumb up!!
Your follow through should end with your throwing arm outstretched towards your target and your body facing forward.
Beginner Tips
We’ve done it! We’ve covered all the nuts and bolts of disc golf. There is of course so much more to learn, but this is everything you absolutely need to know to get started and begin to build a solid foundation of the game. I’m so glad you’ve made it this far in my guide because now, I get to share with you some tips I wish I had known when I first started playing the game that I think will really help you out!
Disc Down
Watching a disc fly is a beautiful and mesmerizing thing. It makes you want to throw further and further to watch it go and it’s tempting to grab a disc with a high speed rating because those are the discs the pros are using to throw really long bombs.
Don’t do that. You don’t have the arm speed for it yet, which means that you’ll actually throw a lot shorter with a high speed disc because you’re not putting enough power into it.
Disc down until you find a disc that matches your arms speed and you’ll find that you’ll actually get much more distance out of lower speed discs. Take a look at recommended discs I have above. Any of these discs are great choices for beginners to the game.
Start With Just Three Discs
From reading this guide, you know that there are a bunch of different types of discs, but you’re probably don’t have a clue as to which discs you should start with. And with discs ranging from $15-$25 each, it can become quite expensive to just start buying a bunch of random discs!
That’s why I recommend starting with just three discs. You really only need three discs to get you started playing disc golf. A fairway driver, a mid range and a putter. That’s it. Honestly. Play every shot with either the driver or the midrange until you get up close enough to putt, then switch to your putter and work on your short game.
There’s a couple of really good reasons why starting with only three discs is a great idea.
- One I mentioned above is the cost. Buying three discs won’t break the bank which is a really good thing!
- Second is that it allows you to develop your form. Different discs do different things. So if you’re throwing a bunch of different discs, you have no way of knowing if a disc flew a certain way because of something you did, or because of something the disc was supposed to do. If you’re throwing the same disc over and over, you can make slight corrections in your form and know that what you’re doing is affecting the disc in a positive or negative way.
Which Three Discs Should I Start With?
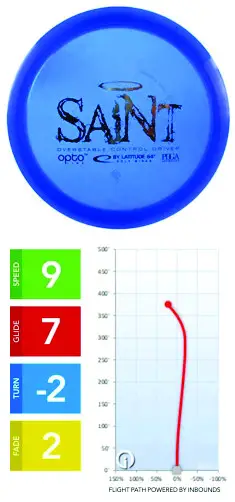
Driver: Saint by Lattitude 64
So which three discs do I recommend? For drivers, I really love the Saint by Latitude 64. This is technically a fairway driver, but for a beginner it’s perfect for driving off the tee as well. It’s a great disc with a ton of glide. It’s also really stable so it shouldn’t cut hard left or right. Lastly, with a speed rating of 9, this disc is within range of most players, even if you’re brand new to the sport.
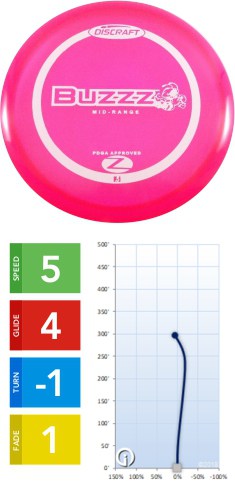
Midrange: Buzzz by Discraft
As for the midrange disc, I’d go with the Buzzz from Discraft. This disc is considered one of the best discs in disc golf and for good reason. It’s ever so slightly overstable and flies really consistently. I carry two in my bag right now and I love this disc.
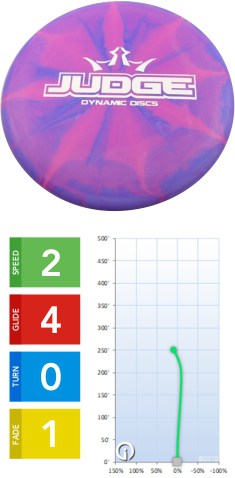
Putter: Judge by Dynamic Discs
For your putter, I recommend the Judge from Dynamic Discs. There are several really amazing putters (Aviar, Luna, etc) but my favorite is the judge. It’s got a great feel in the hand and is great for both putting and throwing which not all putters can do both. It’s a solid putter and I definitely recommend it.
Other Starting Options
If any of these don’t quite seem to your liking, feel free to head over to my favorite discs page for other recommendations.
There’s also a ton of starter packs available for new players. These are prepackaged sets of discs made for beginners. Some are actually really good and have some quality discs that will last you a long time. I put together a list of my favorite starter packs a while back which you can find here. It’s actually a really great guide and I really recommend taking a look once you’re done on this page.
Do I Need A Bag?
A related topic is if you need a bag or not. In disc golf, you’ll find that most players either carry a bag or a cart. Either is a great option if you decide to carry more than three discs with you on the course. An added benefit is that most bags and carts have many pockets and compartments for other useful items like water, food, a windbreaker, extra socks, etc.
But do you need a bag? Well, no, you don’t absolutely need one, but it’s nice to have something to carry your discs and gear in as you play. Any old backpack will do, but if you get a bit more serious about the game, I highly recommend one of the bags I mention here: Top 5 Bags Ranked. Or, if you’re more of a cart person, the Zuka cart is amazing, and you can find it on Amazon here.
Don’t Get Frustrated
Here’s the part where I tell you your future. You’re going to throw some really terrible shots. You may even lose a disc or two… (In fact, I recommend that you stay very clear of any bodies of water until you get a bit more comfortable throwing!)
There’s also a really good chance that you’ll be playing with a group and many of the more seasoned players will most likely be much better than you.
It’s so easy to compare yourself to those other players, but remember that you’re brand new and if you’re not throwing as well as other players, don’t let yourself get frustrated. You’ve got a bunch of time to learn and your just starting out. The most important thing is to have fun with your friends, enjoy the game, and work on developing your form. If you do those three things, before you know it, you’ll be throwing with the best of them!
More Great Tips for Beginners!
I have many more great tips for beginners here, and if you’re interested, they’re really worth the extra few minutes it will take to read them!
Related Articles To Get You Started Even Faster
- Top Tips For Beginners
- Best Disc Golf Discs
- Best Disc Golf Bags
- Top 7 Disc Golf Starter Sets
- How to Throw
- Throwing Styles
- Grip Guide
Wrapping Up
That’s it! We’ve covered everything you need to get started playing disc golf. We’ve talked about how to play the game. We’ve covered everything you need to know about the discs and we’ve talked about how the throw with proper form. I’ve even tried to share with you some helpful tips to get you started.
There’s a bunch more information on this site to help you along your disc golf journey. Don’t forget to browse around for more great information to up your game.
