In disc golf, there’s no one correct way to throw a disc, but there are certain styles of throwing that are generally accepted as good form. In this article, we’re going to cover the three main throwing styles, and the three main release angles that act as modifiers to those throwing styles.
So what are these disc golf throwing styles?
In disc golf, the three main throwing styles are backhand, forehand (also called sidearm) and overhand. Backhand is the most common throwing style, followed by forehand, then overhand, which is the least common of the three. Each style has a distinctive flight path that can be modified by changing the release angle of your shot. These release angles are called Hyzer, Flat and Anhyzer.
Below, we’re going to cover each style, how they fly and how to throw them. We’re also going to talk about the different release angles and how they affect the flight of the disc in relation to the different styles of throwing.
Backhand
The backhand throw is the most common style of throw in disc golf. With the backhand throw, you can perform almost every type of shot, and with proper form, throw farther than any other throwing style. Throwing backhand looks very similar to how you might throw a traditional frisbee with a few exceptions.
The Run Up
Unless you’re throwing a midrange or approach shot, the backhand throwing style typically begins with a run up. A run up is the footwork you perform before every shot to build momentum and get your body in the correct position to throw a clean shot. Using and practicing a run up is a great way for players to develop a repeatable motion which helps to make sure they can throw the same way every time.
A popular run up for the backhand throwing style is called the X Step. It looks like this:
As you can see, the X Step is sort of a cross hop/step that gets your body sideways and allows you to really turn your body, and crank some momentum into your disc as you shift your weight and swing back around.
If you don’t already utilize the X Step in your backhand throw, I highly recommend that you start. The video below from Danny Lindhal is awesome and really helped me as I was learning the X Step. (By the way, I totally recommend taking a look at some of Danny’s other videos. He’s great.)
Form
At first glance, the motions involved in throwing backhand is similar in form to throwing a traditional frisbee, but if you look a bit closer, they’re actually quite different. You’ll notice that when throwing a disc golf disc backhand, the range of motion is much greater. The upper body is turned almost completely away from your target then ripped across the body and released with a wide follow through.
This range of motion is essential in allowing a disc golf disc, which is made specifically to handle higher speeds, to fly much farther and more accurately than a traditional frisbee.
With practice, you can learn to throw different types of shots, which allow you to manipulate the flight path of the disc. Knowing and using these shots gives you the best chance to score well on the course.
If you’d like to learn more about the different types of shots you can throw in disc golf, you should check out an article I wrote last week describing most of the different shots, how they fly and how to throw them. I’ll leave a link here for easy access.
Instructions
If you’d like step by step instructions on how to throw a backhand shot, I just wrote them up in this article here. That link points to the exact location in the article for the backhand shot so you won’t have to scroll to find it. There’s photos and descriptions of each step. I really break it down, so I think you’ll get a lot of great direction from it.
Forehand
The forehand throw, also called sidearm, is the second most common throwing style in disc golf. It’s performed by holding the disc out to the side, pulling along the outside of the body and releasing out in front.
You can throw most of the same shots with the forehand style that you can with backhand, but there are some key differences. Let’s go over them.
Fade
One of the main reasons players develop and throw the forehand throwing style is that it fades in the opposite direction of your backhand throw. For example, if you’re a right handed player and you throw backhand, you shot will almost always finish by curling to the left. This curl at the end of the shot is called fade.
If the same player were to throw forehand, the shot would fade right instead. This is because the spin of the disc goes is in the opposite direction as the spin of the backhand throwing style.
Developing both styles allows a player to choose the style that fits their need. If they need a shot to curl to the left, they’ll most likely throw backhand. On the other hand, if they need the shot to fade right instead, they’ll most likely throw forehand.
There are some exceptions. Backhand turnover shots and anhyzer throws will fade to the right when throwing backhand, but if thrown high enough, they’ll eventually fade back left.
Power
Another key difference between backhand and forehand is the power needed when throwing. A forehand shot requires much less power than the backhand style of throwing. The flick of the wrist is more pronounced with this style, which allows the disc to fly further with less power.
This is one of the reasons many beginners to the game can sometimes see immediate success with forehand shots. They’ll fly much further than the player’s underdeveloped backhand shot, and so many beginners will favor the forehand style over the backhand style when starting out.
Instructions
For step by step instructions on performing the forehand throwing style, head on over to my other article on How To Throw a Disc Golf Disc. That article has some really great photos illustrating and talking about each step of the forehand throw. Also, that link above goes directly to the forehand section so you won’t have to scroll to find it. 😉
Overhand
The overhand throwing style is the least commonly used style and looks someone like the form used to throw a baseball, only aimed higher. There are specific instances where the overhand shot is very useful, but most of the time, you’ll be using either the backhand or forehand throwing styles.

The two shots that require the use of the overhand throwing style are the Tomahawk and the Thumber. Both of these shots are used when you’re directly behind an obstacle that you can’t throw around either side. In this case, it’s best to go straight up and over.
Instructions
The tomahawk and thumber shots are very similar to each other with the one exception that they fade in opposite directions. You can read up on each of these styles and see examples by clicking over to this article here. I’ve also got instructions for each shot, so remember to check that out too.
Release Angles
Each of the three throwing styles have their unique characteristics but each can be modified by changing the release angle. There are three release angles, called hyzer, flat, and anhyzer (or annie), and they modify each throwing style in the same fashion.
Hyzer will cause the turn to be less pronounced and the fade to be much stronger. Flat essentially means the disc is released flat, with no angle to change the flight path of the disc. And finally anhyzer, which emphasizes the turn of the disc, leaving the fade less pronounced.
Let’s go into a bit more detail.
Hyzer
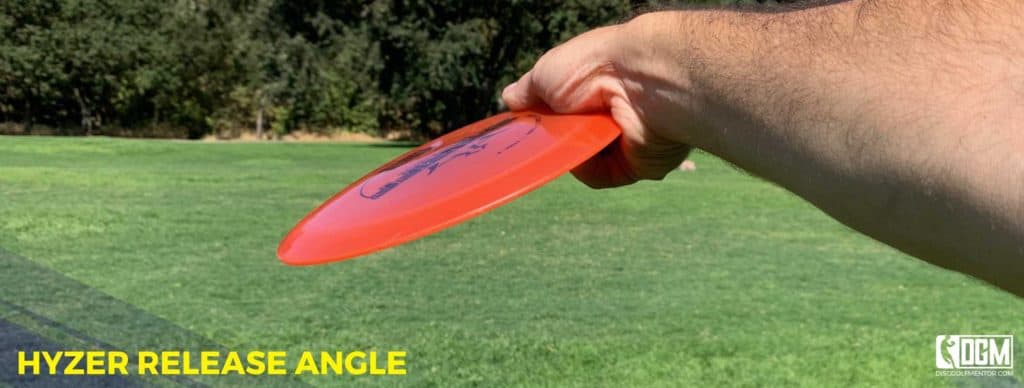
A hyzer angle is created when the disc is released with the left edge tilted downward. (See photo above) To achieve this (when throwing backhand), the player should tilt their entire upper body forward, bending slightly at the waist, but otherwise keeping the motion of their arm and the angle of their wrist the same as if throwing flat. The tilt of the upper body is what creates the hyzer angle.
This angle is great when you need a shot that curves heavily like when you need to get around a large tree or clump of large bushes. A hyzer shot will create a large circling flight path that you can use to your advantage.
Hyzer Flip
There are exceptions to every rule. The hyzer flip is one of those exceptions. This is a shot thrown with an understable disc on a hyzer release angle. The understable quality of the disc allows it to flip up out of the hyzer angle and turn over slightly, before gliding for really good distance and then fading at the end. This is a great shot when going for distance. You can learn more about the hyzer flip shot here.
Flat

Throwing flat is pretty much what it sounds like; when the disc is released flat, or parallel to the ground. Throwing flat should be your standard release angle and you should be able to throw flat consistently in order to have a consistent throw that you can count on to fly the same every time.
Throwing flat is a good starting point for any disc. It allows you to see how the disc flies on it’s own, without any influence from being released on an angle.
Throwing Straight
Throwing straight and throwing flat are two different things. Even when you throw flat, most discs will still want to fade or turn, which makes it extremely difficult to throw straight without the disc turning at all.
Try throwing flat with a really stable disc. I like to throw a Judge on a flat release for my straight shots. If you don’t already have one, I recommend you check it out. It makes for a really great throwing putter. You can pick one up on Amazon here.
Once you have your flat shot down, you can then modify with hyzer or anhyzer as needed to change the flight path of the shot.
Anhyzer
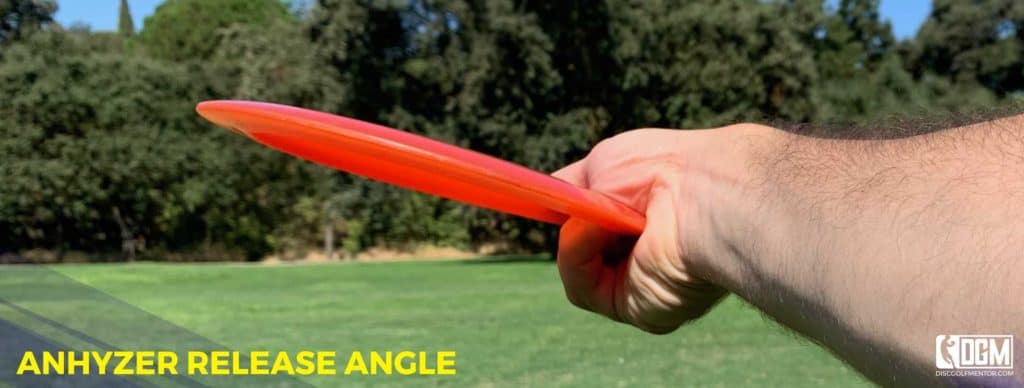
Lastly, we have the anhyzer release angle, also called “annie”. Releasing on an anhyzer release angle will force the disc to turn over more than it would when thrown flat.
This can be to your benefit if you’re a right handed player throwing backhand and you’re trying to make the disc go right instead of left. Or if you’re the same player throwing forehand and you want the disc to go left instead of right.
Throwing anhyzer is also a great way to get a nice S curve flight path out of your disc. It’s a great way to get around trees or cut a path through the woods.
Throwing anhyzer with an overstable disc will allow you to get the most distance out of your overstable disc. This type of shot is called a Flex Shot and is a great shot for distance drives. You can learn more about Flex Shots here. And if you want to try out the Flex Shot, you can check out a list of my favorite overstable drivers by clicking here.
Wrapping Up
That should be everything you need to know about throwing styles and the release angles used to modify them. I encourage you to take this knowledge with you play and practice and that you really try to work these concepts into your game. You’ll be amazed at the amount of flexibility these three styles and angles will bring to your game.
Good luck, and have fun out there! =)
