When you first pick up a disc golf disc, it may seem pretty familiar to you. You’ve most likely thrown a frisbee at some point in your life and it should feel quite natural to just reach back and throw the disc, just as you’ve done with a frisbee.
This is one of the great things about disc golf. It’s extremely accessible to a huge variety of players, and the motions involved are familiar to most people.
So if you’re asking, “How do I throw a disc golf disc?” and I had to boil it down to the simplest answer for a beginner, that answer would be:
Throwing a disc golf disc is very similar to how you would throw a frisbee. Hold the disc in your dominant hand, reach back, pull through and release. That’s really all you need to know to get you started, but if you want to increase your skill and throw more advanced shots, you’ll need to learn a little bit more.
Learning more about the game and how to throw will help you as you grow as a player. You’ll throw farther and more accurately. And you’ll be able to perform different shots and be able to judge which type of shot fits best with the situation you’re in.
In this article we’re going to cover everything you need to know about throwing a disc golf disc. The basics of the different types of throws and how to perform them. How to throw different types of discs and which throwing angles are useful. We’ll even cover how to throw far, which, let’s face it, is one of the best things in disc golf. Let’s jump in.
What we’re going to cover in this article:
- How to Throw Backhand
- How to Throw Forehand
- How to Throw Overhand
- How to Hold The Disc
- Stance & Footwork
- Release Angles
- The Basic Shots
- How To Throw A Putter
- How to Throw Far
- How To Throw Accurately
Throwing Styles
In disc golf, there are three different types of throws, or throwing styles: Backhand, forehand (also called sidearm) and overhand. The stance, grip, form and release of each type of throwing style is different, which means that the flight of each type of throw will be different as well.
Let’s go into a bit more detail for each of these three styles.
The Backhand Throw
The backhand throw is the most common type of throw and looks most similar to how one might throw a frisbee. This throwing style is extremely versatile and can be used for almost any type of shot in disc golf. Keep in mind that when throwing backhand as a right handed player, the disc will almost always fade to the left and when throwing left handed the disc will almost always fade right.
As you get better at throwing backhand, you’ll be able to manipulate the disc so that it flies differently, but the fade direction is almost always consistent, so plan for that fade as you aim your shot.
How To Throw Backhand
Step 1: Grip

Grip the disc in your dominant hand with your thumb on the top plate and your fingers curled around to press on the inside of the rim. The disc should be pressing into the meat of your palm and should be held with firm pressure.
Step 2: Stance
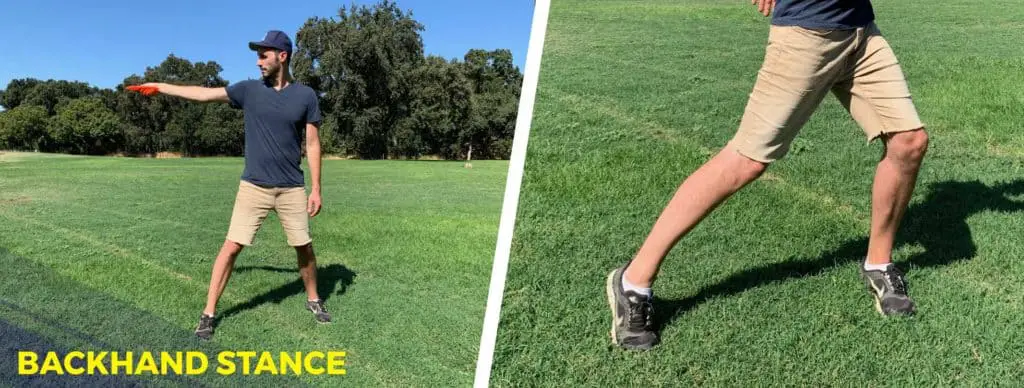
Stand sideways with the shoulder of your throwing arm facing your target. Your shot will follow the line of your shoulders, and when you fully extend your arm, you should be pointing at your target.
As you progress, you’ll want to incorporate a run-up into your throw. This is what we call the footwork you perform every time you throw to make sure you’re body is in the correct position. This run-up not only adds momentum, but also puts your body in the best position to generate the most power and transfer that power into your disc.
The best run-up is the X-Step, which we’ll cover in another article (I will link it here as soon as I write it up). For now, you should start from a stationary position to get the motions of your hips and upper body correct. Once you’re happy with that, you can then incorporate a run up into your shot.
If you feel like you’re ready for the X-Step, you can get started by watching this video here which I found useful.
Step 3: Load Your Back Leg
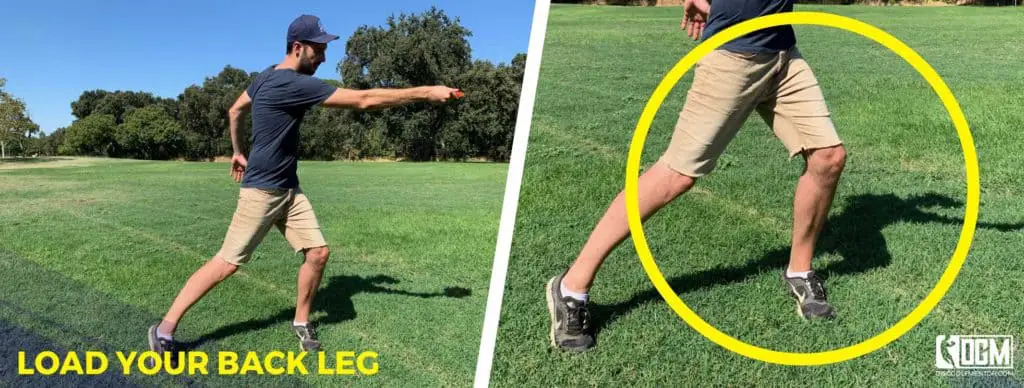
Bend your knees and load your back leg. A lot of the power in the backhand throw comes from your legs, so load your back leg with about 75% of your weight while keeping balanced.
You’re forward most leg should be slightly offset with your toe pointing away from your target with your heel off the ground.
Step 4: Rotate and Reach Back
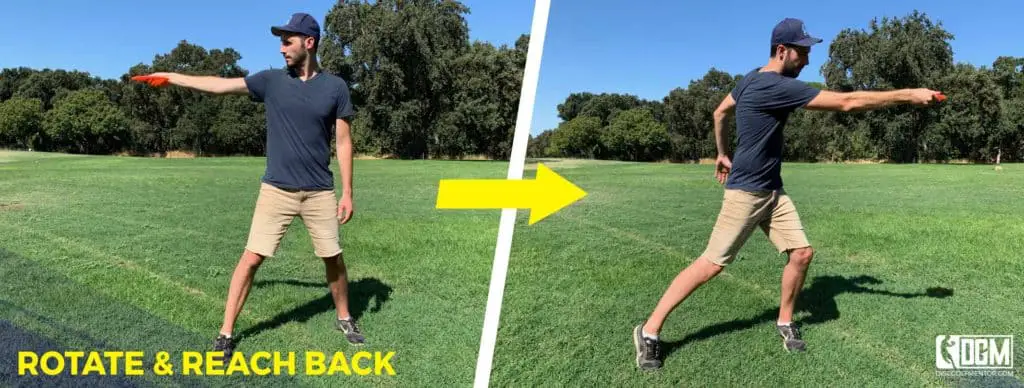
Turn your shoulders as you reach the disc back. Turn your head as you do this. At this point you should be looking away from your target. Trust your body and that you’ve lined up your shoulders in the right place to put the disc where you want it to go.
It’s also very important to keep from curling the disc back behind you. Your body should not be between your disc and the target. Turn your upper body so that you open up your shoulders which will allow you to reach straight back without your body getting in the way.
Step 5: Pull Through
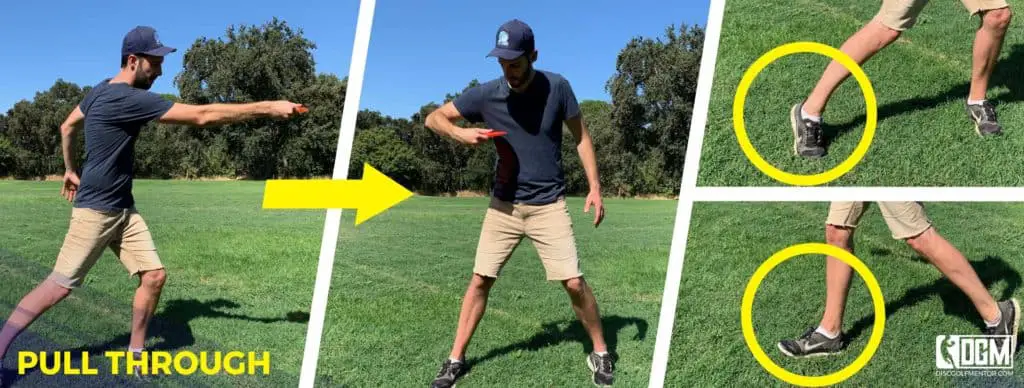
Pull the disc through as you rotate your upper body back towards your target. Shift your weight from your back leg to your front let and rotate your hips as you pull. All of this weight transfer is put into the disc.
As you transfer your weight, your heel comes down to the ground and you rotate on the heel of your foot. Practice this move a bit before you throw to get the motion down, but it will come naturally with time.
Step 6: Release & Follow Through
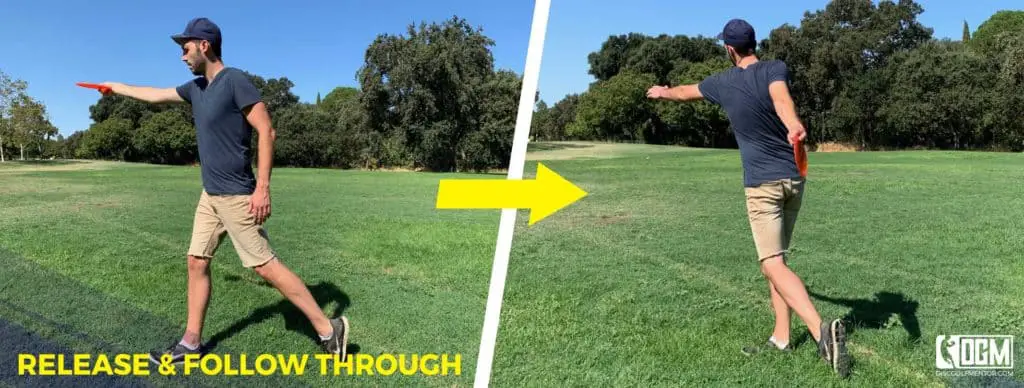
The disc should rip out of your grip once your arm is fully extended. Focus on keeping the disc as level as possible as it leaves your hand. Let your arm continue to swing around in a smooth follow through.
You may notice that in the photos above, I don’t actually release the disc. (Good eye!) These photos are just for illustration. You get the idea. =)
The Forehand Throw
The forehand throw (also called sidearm) is the second most common type of throw in disc golf, performed by holding the disc out to the side and releasing out in front of the body.
A wide range of shots can be performed with a forehand throw, but the most common reason to throw forehand is that it fades in the opposite direction as your backhand shot. Knowing both of these throwing styles gives you the ability to have your disc curve in either direction which is extremely useful.
Of course, this isn’t the only reason to throw forehand. Forehand shots typically have a more accurate release, which makes them great for wooded holes. They also require less power to throw, though most players eventually get better distance out of a backhand shot.
How To Throw Forehand
Step 1: Grip

Hold the disc with your index and middle fingers pressing against the inside rim of the disc, and with your thumb on the outside pressing firmly against the top plate.
Step 2: Stance
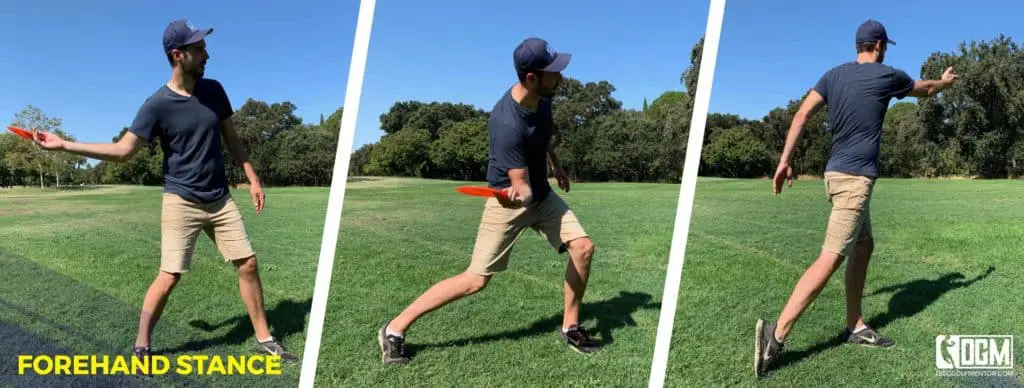
Stand sideways with your throwing arm back and the shoulder of your off-hand facing the target.
Step 3: Reach Back
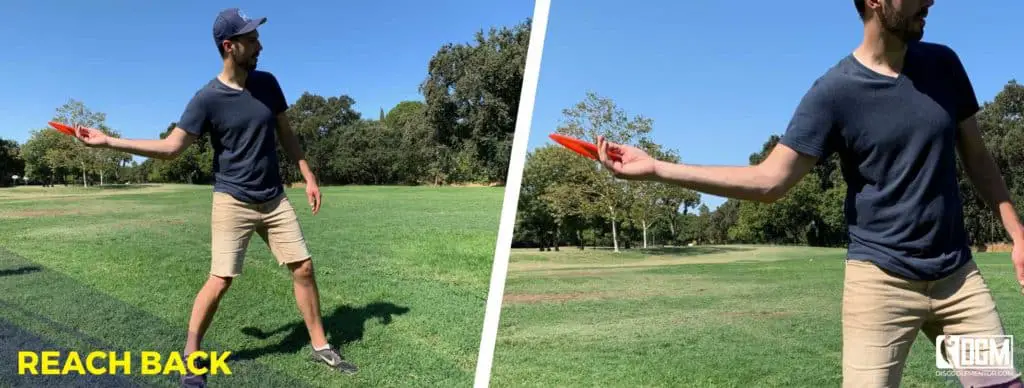
You don’t need to reach back much to throw forehand. Hold the disc out to your side and reach back slightly. Remember to keep your elbow fairly close to your body in the reach back and to also lead with your elbow as you start your throw.
** A quick note on the elbow. It’s common to misunderstand this step and keep the elbow glued to your body throughout the throw. This will cause the disc to flip over and hit the dirt. Keeping your elbow in close and leading is only for the first part of the throw. Once the disc moves past your body, you should be fully extending your arm outward and pointing towards your target. More on this in Step 5.
Step 4: Step and Rotate
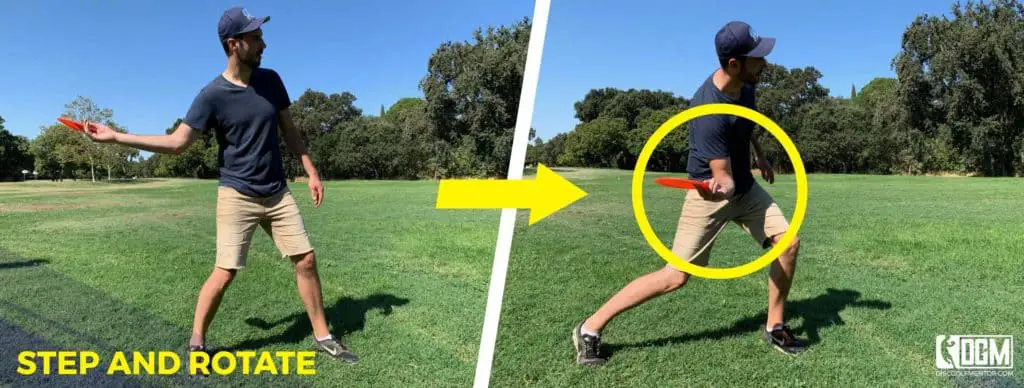
After you reach back, take a small step with your leading foot and shift your weight forward as your rotate your hips and pull the disc through.
As you get better and more comfortable throwing forehand shots, you can incorporate a skip step into your throw to add more power.
Step 5: Flick and Follow Through
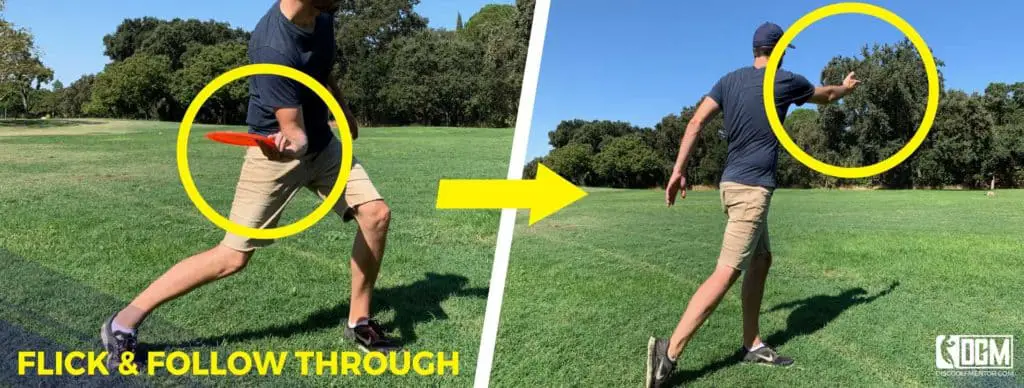
Pull the disc all the way through to the front of the body, fully extending your arm and keeping your palm up towards the sky. This keep the disc level as you throw. After the disc passes your body, rotate your hand forward, flicking the disc out towards the target.
Your follow through should place your throwing arm across the front of your body.
NOTE: Keep the disc as level as you can all the way through your throw. I’m not doing a great job of this in the photos above, but keep this in mind and practice keeping the disc level.
The Overhand Throw
The overhand throw is performed by throwing the disc almost like you would throw a baseball, except aimed more upwards into the air. This type of throw isn’t used very often but is great for specific scenarios. The shots that use an overhand throw are Thumbers, Tomahawks and Turbo Putts. I’ll be covering all of these below.
But Wait! There’s More!
So far, we’ve talked the steps involved in throwing the three different styles of throwing a disc golf disc. That’s a great start and you could take that information, head out to the course, and start throwing right now with no problems at all. (There’s a “but” coming in 3… 2…)
But, there’s so much more to throwing a disc! Knowing the movements is only half the battle. What makes a good player great is knowing the rest of it. The disc angles, the grips, the footwork, the shots… It’s a lot to cover, so if you’re not ready right now to read it all, remember to come back and take it all in at a later time. This is the stuff that really changes your game and makes you a great golfer.
How To Hold (or Grip) The Disc
In this section, we’re going to talk about the three most common grips in disc golf, power grip for backhand, modified fan grip for backhand, and standard grip for forehand. There are a few more, but for the most part, these three grips are all you need.
Keep in mind, each player eventually settles into a grip that’s most comfortable and effective for them and there’s no one grip that’s right for everyone. You may find that you modify these grips or create one entirely your own. That’s okay! These grips are a starting point and they work for most people, but you should throw what works best for you.
Power Grip (Backhand)
Used For: Backhand Drives, Backhand Fairway Drives
The power grip for backhand is one of the most common grips for driving off the tee. This grip allows for a very solid hold on the disc so you can put more torque in your swing and generate more power without the disc flying out too early. That’s really the greatest benefit of this grip. It reduces slipping at higher speeds, so your disc flies out of your hand at the correct time, even with a lot of torque in your swing.
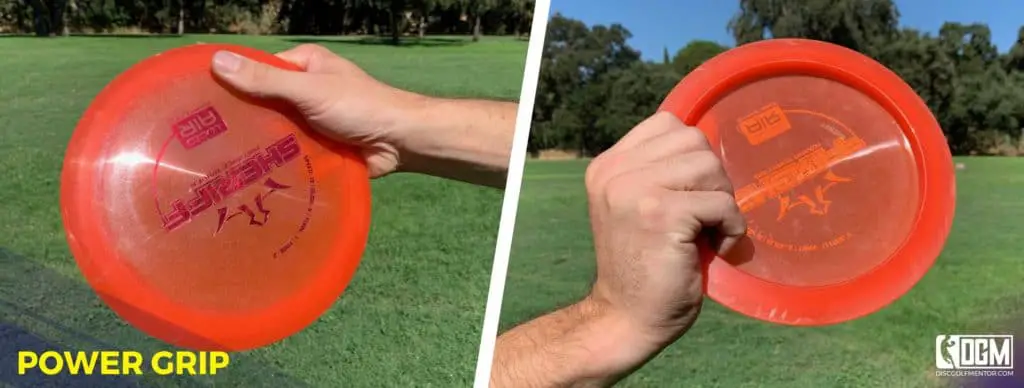
To use the power grip, hold the disc firmly in the middle of your palm with your thumb on the rim of the top flight plate and your fingers curled around the edge with the tips set inside the rim of the bottom of the disc. Hold the disc firmly but not too tight and keep your wrist straight, but loose as you throw.
Modified Fan Grip (Backhand)
Used For: Backhand Fairway Shots, Putting
The fan grip is mostly used with midrange discs and putters as they have a deeper profile than drivers. This makes using a power grip awkward in the hand and makes the disc less stable. Using a fan grip, which splays out the fingers on the bottom of the flight plate, gives you more stability and accuracy for discs that are a bit deeper in profile.
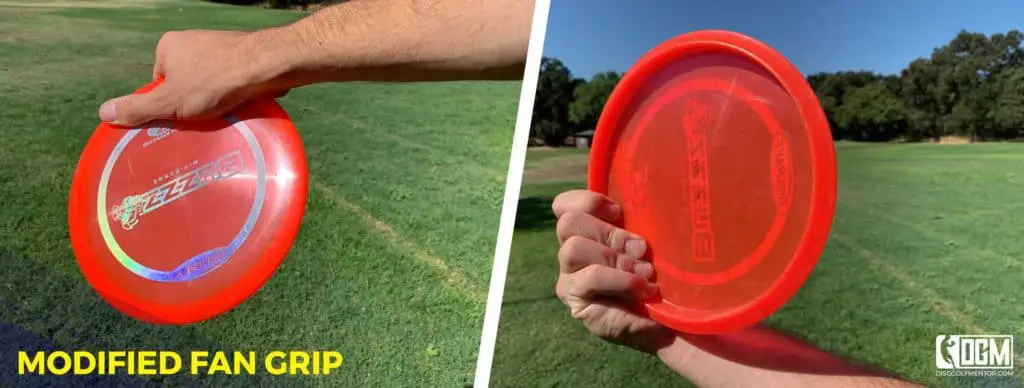
To use the modified fan grip, start by holding the disc in the middle of your palm with your thumb on the top flight plate. The index finger and pinky should be curled underneath, just like the power grip, but the middle and ring fingers should be almost flat against the bottom of the disc for support. This gives you a more stable grip on the disc, which translates to greater control.
Standard Grip (Forehand)
Used For: Forehand Drives, Forehand Fairway Shots
The standard or traditional forehand grip is my go-to grip for forehand shots. This grip allows you to hold the disc firmly and controllably in your hand as you throw. The finger placement of this grip gives you more stability, so the disc doesn’t wobble as it’s released, which is very important for control.
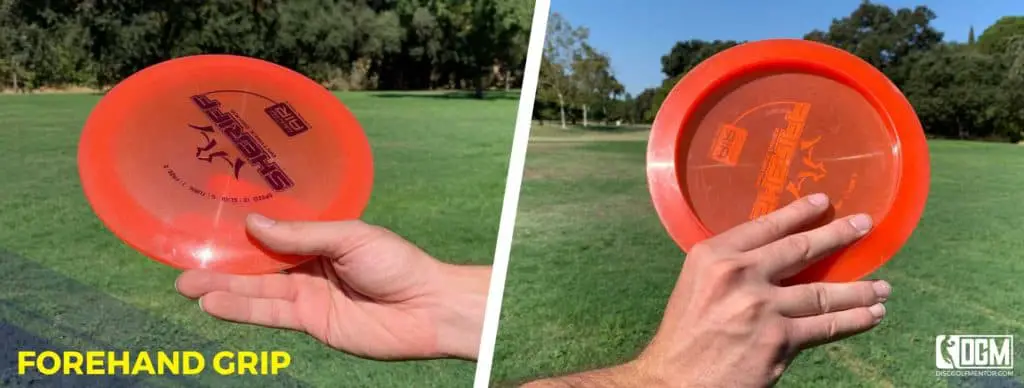
Hold the disc with the outside rim resting on the webbing part of your palm, with your thumb on the top flight plate and your index and middle fingers flat against the bottom of the disc, tucked against the inside rim. Your ring and pinky should be outside the disc held loosely together and against the outside of the rim for support.
Putting Grip
Used For: Push Putting, Spin Putting
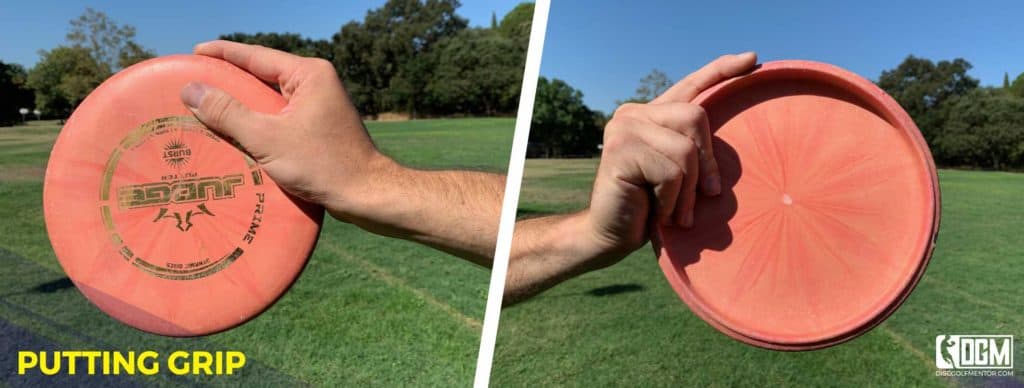
There are a few variations for putting grips but this is the one I like best. It gives you a good balance between control, stability and comfort. Hold the disc like you would with a modified fan grip (see above), except with this grip, you take in your index finger and place it alone the outside edge of the disc. This gives you extra control which is vital when putting.
Stance & Footwork
I recommend that most new players to the game start out with a stationary stance. This allows them to work on the upper body movements and the weight shift from one leg to another as you throw. Once you feel more comfortable throwing and feel that you are ready to move onto a more advanced style of throwing, you should incorporate a run-up into your throw. This is just a term we use for the footwork performed before every throw to get your body into the optimal position for throwing far with accuracy and power.
The most popular run-up, or footwork, for the backhand shot is called the X-Step. The X-Step puts your body in the perfect position to throw backhand and so I’ll be covering every aspect of the X-Step in a future article. For now, you can learn a ton about the X-Step from this video by Danny Lindhal that I found extremely helpful.
For forehand thrower, the run-up is slightly different for all players, but I’ll be running you through what I use in a future article. For now, work on your stationary forehand throw using the steps below in How To Throw Forehand.
Release Angles
The flight path of a disc is mostly determined by two things. Stability and angle of release. The angle of the disc as it leaves your hand is a big part of throwing a disc golf disc and can have a dramatic effect on how the disc flies.
The next few sections are going to describe the release angles available to us and how the affect the flight path of your disc.
Hyzer
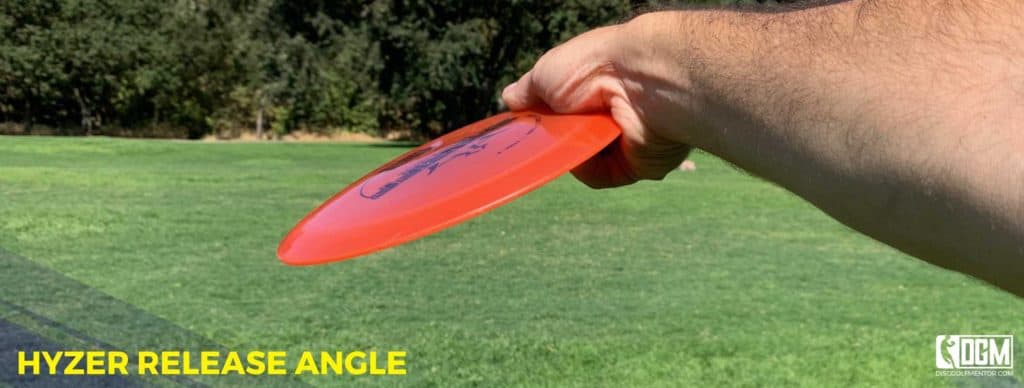
A hyzer angle is when the disc is released with the furthest edge tilted downward. To achieve this (when throwing backhand), the player should tilt their entire upper body forward, bending slightly at the waist, instead of rotating the disc in their hand. The player would then go through the motions of throwing the disc just as they would normally, but since their upper body is tilted slight, the disc will be released tilted.
This angle causes the disc to turn more heavily to the left (when throwing RHBH). The more you tilt, the more hyzer there is and the more of a turn in that direction you will have.
The hyzer angle is great for getting around bends in the course, throwing around trees or other hazards, or shots like skip shots and hyzer flips, that require you to throw on a hyzer.
Flat

Throwing flat is exactly what it sounds like; when the disc is released flat, or parallel to the ground. Throwing flat should be your standard release angle and should be practiced so that during every stage of your throw (the run up, the reach back, the pull through and finally the release) the disc is flat, or parallel to the ground.
Throwing flat is a good starting point for any disc. It allows you to see how the disc flies on it’s own, without any hyzer or anhyzer influence.
Throwing flat is also the best way to throw a disc straight. If you choose a more stable disc, something like an Axiom Theory, throwing flat gives it the best chance to stay flat throughout it’s entire flight path.
PRO TIP:
A good way to practice throwing flat is to perform your entire swing in slow motion while watching your disc to see if the angle changes. If it does, change that part of your swing so that the disc stays flat.
Anhyzer
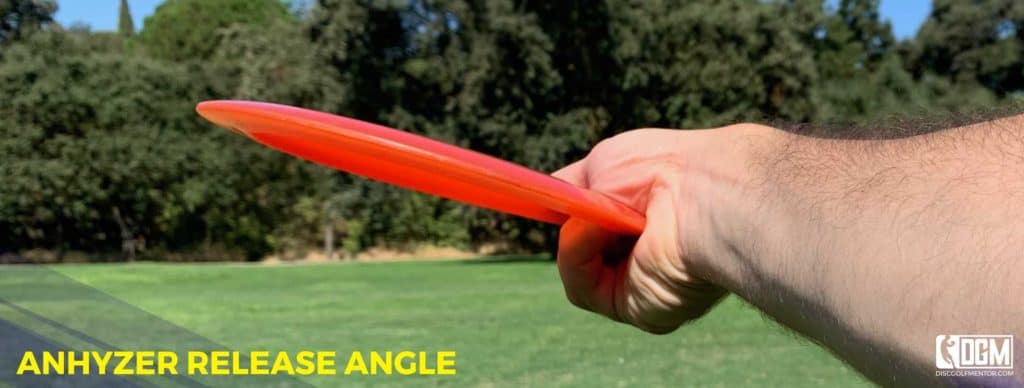
The anhyzer angle is when the top of the disc is tilted slightly toward your body. This forces the disc to fly to the right (when throwing RHBH), more so than it would naturally.
This can be incredibly useful for players that like to throw backhand, since backhand shots typically fade left (for right handers). Giving a player the ability to throw right instead is a huge bonus.
Disc selection with an anhyzer shot is pretty important. Choosing an overstable disc will give you a flight path on anhyzer that goes right initially, but then cuts back on it’s flight line to fade left. Choosing a stable or understable disc an anhyzer will make the disc go right, and fade back left slightly, or even not at all, depending on the disc and how emphasized the anhyzer is.
Nose Up
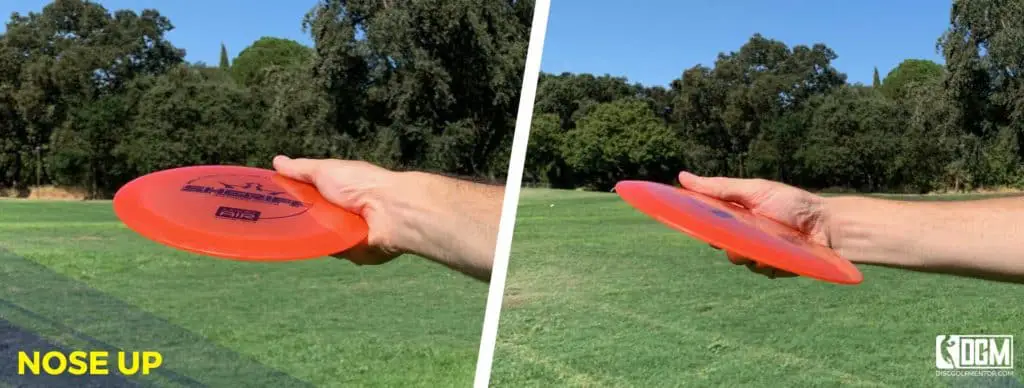
Lastly, we need to cover nose up and nose down as this is one of the areas where I see beginners loosing tons of distance. The nose of the disc is the front of the disc as it’s flying through the air. If the disc is nose up, that means that the nose of the disc is tilted upwards relative to it’s trajectory.
A disc flying nose up will never travel as far as a disc flying nose down. This is because the forward lip of the disc is tilted upwards which means the bottom of the disc is exposed to the wind load as it’s flies. This is bad for us, because the bottom lip of the disc is basically catching all the air as the disc tries to fly, creating drag and robbing us of distance.
Nose Down
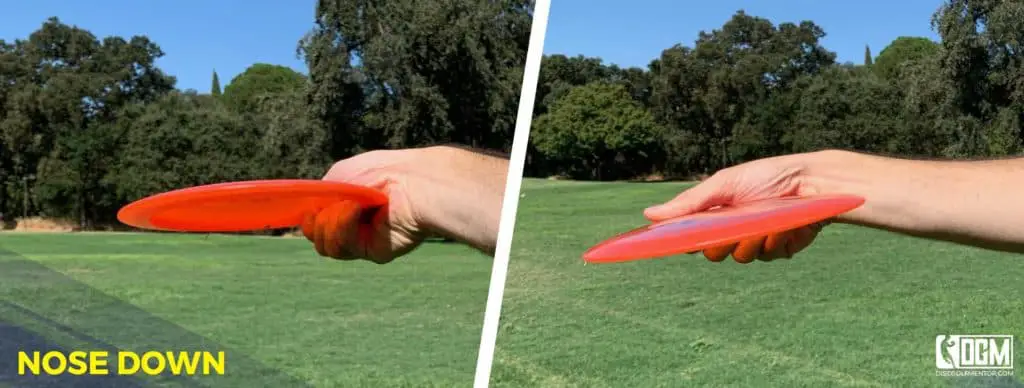
Nose down on the other hand is when the disc is relatively level, or when the front lip of the disc is tilted slightly downwards relative to the trajectory of the disc as it flies. (The photo above is actually slightly exaggerated. You should be a little more flat than this.) This angle gives us less drag and better aerodynamics, allowing the disc to fly faster and farther. This is what we want!
The Basic Shots
Now that you know how to throw, let’s talk about some of the basic shots that you should be learning to throw.
In disc golf, it’s possible to manipulate the disc as you throw so that it flies a certain way. We do that by choosing the right disc and releasing that disc on the correct angle for the desired shot. Below, we’ll talk about the most common shots in disc golf, and how and when to use them. Knowing these shots is a huge advantage as it allows you to choose the right shot according to the situation you find yourself in on the course.
Flat Shot
A flat shot is one of the more basic shots in disc golf and simply means to throw the disc on a flat angle. Throwing flat helps keep the disc more stable and allows you to rely on the properties of the disc, rather than your manipulation of the disc, to guide the disc as it flies.
I recommend that beginners use this type of shot over the others listed below in order to develop proper form and the ability to throw the same way consistently and reliably.
Keys to success with the Flat Shot:
- Practice makes perfect. Practice your form until you can throw flat every time.
- Throw a stable disc on a flat angle for a very straight shot
S Shot
The S Shot in disc golf is a shot thrown to the left side of the fairway using an understable disc. Because of the natural quality of under stable discs to turn over, the disc will drift to the opposite side of the fairway, then finish by coming back to the left, creating a long exaggerated S shape.
This description assumes you’re throwing right handed with a backhand throw. If you’re a lefty, it would be opposite.
The S Shot is great for players looking for a long flying shot with a curving flight path. It’s also great for players with less power who are looking to add more distance to their drives.
Keys to success with the S Shot:
- Use an understable disc
- Use a disc with a high glide rating
- Aim slightly higher than normal. This shot needs room to maneuver
- Throw flat. If given too much anhyzer, the disc will continue to flip over in the turn and end up in the dirt
Hyzer Flip
The Hyzer Flip is a type of disc golf shot performed by throwing an understable disc with a hyzer angle of release. The disc should flip up to flat and turn over slightly before fading back to finish. This is a great shot to use in the woods and, if performed correctly, should increase your drive distance.
Keys to success with the Hyzer Flip:
- Use an understable disc. See my top choices for understable discs here
- Throw on a hyzer angle of release. If thrown flat, this shot can easily turn into a roller shot.
Flex Shot
A Flex Shot is a disc golf shot performed by throwing an overstable disc with an anhyzer angle of release. When throwing a flex shot RHBH, the disc will fly left to right because of the anhyzer release angle, then the overstability of the disc will draw it back to the left.
The flex shot has a long flight path and is used to throw for greater distance than a normal flat shot. This is a very common type of throw for both advanced and professional players.
Keys to success with the Flex Shot:
- Use an overstable disc. See my top choices for overstable discs here.
- It’s very important to throw this shot nose down. If you throw a flex shot nose up, the drag will cause the disc to stall in the air and come crashing down
- Throw on an anhyzer angle of release. You need anhyzer with this shot to exaggerate the turn, else this shot will only fade and lose distance.
Spike Hyzer
A spike hyzer in disc golf is a shot thrown very high at an extreme hyzer angle of release, which is meant to spike down into the ground and stop right where it lands without skipping or rolling.
It’s a great shot for shooting over trees or other obstacles and when you need the disc to hit the ground and stick in place. In some cases, a spike hyzer can even slice into the ground and stand on edge.
Keys to success with the Spike Hyzer shot:
- Use an overstable disc. See my top choices for overstable discs here.
- It’s very important to throw this shot on an exaggerated hyzer angle of release.
- Throw this shot high. Throwing this type of shot too low may turn it into a skip shot instead.
Skip Shot
A skip shot is a shot thrown low with a lot of spin. The spin is what allows the disc to skip off the ground without simply stopping once it hits. Keeping the disc low will give you the angle you need to keep if from digging into the ground.
Skip shots are great for getting around obstacles, especially if there’s a low ceiling. They work best when there’s open dirt areas or short grass, but not so well if there’s a lot of ground cover or bushes in your path.
Keys to success with the Skip Shot:
- Use an overstable disc. See my top choices for overstable discs here.
- Throw this shot on a hyzer angle of release to get more turn.
- Throw low; roughly shoulder height. Throwing this shot too high will cause the disc to dive bomb the ground.
Turnover Shot
Turnover refers to a disc that banks heavily to one side or the other in the initial phase of flight. This usually happens when a disc is thrown with enough speed to overpower it’s ability to fly stable, resulting in turnover.
When done intentionally, this is called a turnover shot, and can be used to fly around bends in the course, or obstacles. Unintentionally, such as when a player overpowers an understable disc by accident, the disc often doesn’t have the height or stability to come out of the turn, which results in the disc crashing to the ground very early in it’s flight.
Keys to success with the Turnover Shot:
- Use a stable or understable disc. See my top choices for stable discs here and understable discs here.
- Throw this shot flat to anhyzer with stable discs and flat with understable discs.
Thumbers & Tomahawks
A thumber in disc golf is an overhand shot, similar in form to throwing a baseball. When throwing, the thumb is placed on the bottom rim of the disc with the fingers on the top plate. Thrown right handed, the thumber will barrel roll to the left, then fade back to the right. Expect to throw the thumber around 150 feet to 250 feet at the amateur to intermediate levels.
The tomahawk in disc golf is an overhand shot, similar to throwing a baseball. When throwing, either the index finger or middle finger is placed on the inside rim of the bottom of the disc, with the thumb on the top plate. Thrown right handed, the tomahawk will barrel roll to the right and finish by fading left. Expect to throw a tomahawk around 150 feet to 250 feet at the amateur to intermediate levels.
Keys to success with Thumbers and Tomahawks:
- Aim higher than normal. This shot needs room to barrel roll and fade.
Turbo Putt
The turbo putt is an overhand putting style performed by placing the thumb on the bottom of the disc with the fingers on the outside rim for support. The disc is then thrown overhand with a flicking motion almost as if waving your hand.
It’s a great putt for long distances and putting when there may be an obstacle in your way preventing you from spin putting or push putting from your center. An example of an opportunity to turbo putt would be if your lie is directly behind a tall bush, you could throw a turbo putt over the bush.
Keys to success with the Turbo Putt:
- Place your thumb directly in the center of the disc for support.
- Fan your fingers in a downwards motion as you throw, ending by pointing at your target
Roller
The roller is a type of anhyzer throw that causes the disc to roll on the ground instead of fly through the air. When thrown correctly, the roller will fly out of the hand on a heavy anhyzer angle, causing the dis to turn over onto it’s side, hit the ground, and keep going for a fair amount of distance.
A roller might be the right shot for you if you find yourself in a position where there is a low ceiling and the ground is the only open path to the basket.
If you want more in depth instruction on how to throw the perfect roller, see my article dedicated to rollers here.
Keys to success with the Roller:
- Use an understable disc. You can see my top choices for understable discs here.
- It’s very important to throw this shot on an exaggerated anhyzer angle of release. The angle you release this throw will most likely be the angle it hits the ground and that angle will determine how it rolls
- Throw this somewhat low to the ground. You don’t want the disc to level out in the air. The more level it is, the less likely it is to roll.
How To Throw A Putter
The instructions for how to throw backhand and forehand are great for drives and midrange shots, but putting is slightly different. In general, there are two types of putts, the push putt and the spin putt.
There’s also turbo putt, which we covered in the shots section above, but that’s a more advanced and less commonly used style of putting, so we’ll stick to push and spin putting for now.
Here’s a great video by Dynamic Discs on putting:
The Push Putt
Push putting is a putting style in disc golf that is more of a toss than a throw. Push putts have low spin and more height as they travel in an arch. This makes them more susceptible to wind and lowers the distance they can be thrown.
The advantage of push putting is that most newer players find push putts to be more accurate and less difficult to perform, which can make this style of putting a more reliable option.
To perform a push putt, start in a natural putting position with your hips squared up to the basket. Hold the disc in front of you with your arm extended. Bring the disc downwards in front of you while keeping it in line with the basket, and then lift the disc back upwards and release in a smooth motion. The motion is similar to an underhanded toss.
All of this should be done with the disc in line with the basket and as you release your hand should stay on that line. Any deviation from that line will cause the disc to be off target.
The Spin Putt
Spin putting is when you putt more spin on the putter as you release it. Spin putting is great for inside and outside the circle and is a better type of putt for windy conditions as the disc will be more stable with more spin. This putting style also tends to be more accurate at longer distance putting.
The downside of the spin putt is that it’s a bit harder to aim. You really need to practice this style of putting for it to be reliable. A miss with a spin putt will tend to be a long miss because the spin gives the disc more glide.
To perform a push putt, stand in a natural putting position with your hips squared up to the basket. Aim the disc at the basket, then bring the disc in towards your hips/stomach by bending your elbow. Bring the disc back out towards the basket quickly and release in a smooth motion while putting spin on the disc.
This tends to be more of a throwing motion than an underhanded toss. Depending on how far you are from the basket, your aim point will change because the disc will fade more the farther you are from the target. Practice this style of putting a lot in order to find your range.
How To Throw Far
One of the most common questions beginner and intermediate players ask is how to throw a disc golf disc farther. I definitely resonate with this question as I’ve asked this many times as well as I’ve tried to push my distance further and further. The answers I’ve found might surprise you.
In most cases, throwing farther all comes down to form. It’s not because you’re not strong enough or your arms aren’t long enough or any of the other excuses. If you want to throw farther, work on your form. Scroll back up to the top of this article and practice the throwing steps I’ve listed there and make sur you’re doing them correctly.
For more in depth instruction, I recommend you watch this video:
How To Throw Accurately
Throwing accurately, in my opinion, is one of the most under appreciated skills in disc golf. This is a make or break skill. You could be the world record holder in distance drives but if you can’t aim it accurately, what’s the point?
All this boils down to is practice. To be more accurate, you should be practicing by throwing discs at a target and striving to get closer with every throw. Also, you can practice throwing specific types of shots with the aim that they all fly exactly the same way and release at the same point. I recommend an hour of practice a couple times a week or more depending on how quickly you want to progress.
Wrapping Up
I know this is a lot of information, especially for the newer players out there. Take in what you can and reference back to this article as you progress to take in more information and keep learning. Practice your throws, practice your shots, and practice throwing for accuracy and distance.
The main thing is to have fun while you’re out playing disc golf. Very often, we take things too seriously and it’s easy to get caught in your score or mistakes you might have made. Let all of that baggage go, and just focus on having a good time. There rest of this stuff will come with time and practice! That’s why I always say…
Good luck, and have fun out there!