Even though every top player insists that putting is the most important aspect of the game—by far—all aspiring players want to be able to throw farther. You may be frustrated with your distance, or you may not consider yourself overly athletic, and so you wonder, Is it possible for me to considerably increase my driving distance?
The short answer is yes. The long answer: it takes practice! This article describes assorted biomechanical techniques and practice tips so that you can get to work and achieve better distance on the course. I discuss everything that helps you throw farther including:
- Grip
- Disc Selection
- Flight Paths
- Wind Direction
- Form
- Power Pocket
- Grip
- Strength Training
- Field Work
- Measuring Results
- and even some minor things like whether you should start your run-up from off the tee pad
This article focuses on the backhand (and assumes right-handedness in some cases), though many of the concepts will certainly carry over for forehand throwers. Some parts may seem trivial but I include them for completeness because every improvement you make in your distance skills and style will have a cumulative benefit.
The Importance of Disc Selection
Let’s start with disc selection. Obviously, on long holes, you should always throw 12- or 13-speed discs because they fly farther, right? Whoa cowboy, that’s not necessarily true! There are many reasons you can get better performance with a slower speed disc. For example:
- If you don’t have adequate arm speed for your heavy higher speed disc, it might fade left way too early in your flight path, robbing you of critical distance. In that case, you should consider a disc with less fade, or less weight, or less speed. The only way to find this out is to practice with different discs. Lots of practice.
- With higher speed discs, it’s much harder to achieve a soft landing, especially on hard-packed dirt or short grass. If you throw a brilliant long distance drive and it skips OB, sending you back to the drop zone, then you haven’t actually thrown very far at all, and you’ll take a stroke penalty to boot. On some hard surfaces, 12-speed discs can skip over 70 feet! You must anticipate that and carefully consider flight control in disc selection because ultimately you want to get closer to the pin, not just impress your card mates with how far your disc flew.
Having said that, if the hole is long and fairly open, then you should use a high speed disc. But two other key questions are how much turn and fade should it have?
Unless you are throwing a roller, you usually don’t want the turn number to be less than -1 or -2, and unless you are throwing into a strong wind, you usually don’t want the fade number to be more than 2 or 3. The reason for that is that for best distance you want the flight to stay flat as much possible. (For more details, see my article Which Throw is Best for Distance – Hyzer or Anhyzer?)
Remember, the previous paragraph applies to open fairways, but as you improve your game, you’ll learn there are many cases where you can throw farther with a turn number of -3 (e.g. hyzer flip through an S-curve gap) or with a fade number of 4 (e.g. facing a strong headwind, or the fairway is straight with a left bend near the end, assuming a right-handed backhand or lefty forehand).
Grip
I’ve noticed that many of the top disc golf coaches aren’t dogmatic that their grip is the “best” and the one that beginners should adopt. I agree! It’s much more important for you to experiment with different grips when you are starting out and find what is comfortable for you. Be careful, because if you play for months without experimenting, you will become highly accustomed to whatever grip you started with, and it will be difficult to switch later if you discover that a different grip is technically more suitable. Also, you may prefer different grips for putting, approaching, and distance driving.
For distance, I suggest starting with the power grips in the Grip Guide article. In addition to those power grips, let me introduce you to an odd but popular variation called the Bonopane grip, invented by Alan Bonopane who was a famous guts, distance, and double disc court champion in the 1970’s. Many other strong players still use this grip. See photo.
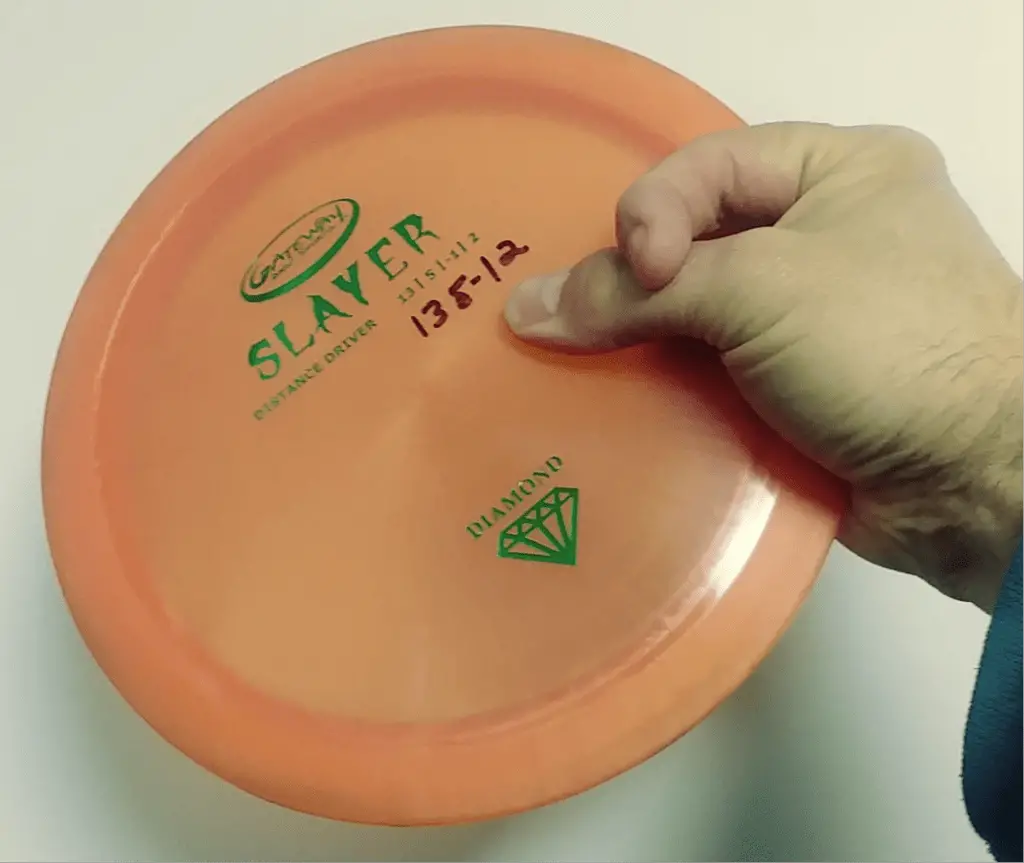
What was Alan thinking? First, it helps keep the nose angle down, which is good for glide when you have a tailwind, and avoids an airbounce or stalling out by throwing too high. Second, Alan claimed that it reduces friction from the forefinger at the instant of release. If you want the disc to snap off of your stronger middle finger at release, then you’ll conclude that there really isn’t any better place to put your index finger than over your thumb, as in the Bonopane grip.
I’ve thrown the power grip in distance competitions where accuracy isn’t a concern, but for power shots in golf, I like the modified power grip.
Hyzer, Anhyzer, or Roller?
This section is more about strategy than technique, but I’m trying to cover everything, so bear with me. Many holes offer alternate flight paths. If pure distance is the only concern, and it rarely is, then we could over-generalize and say that rollers travel farther than anhyzer flights, and anhyzer throws fly farther than hyzer. (Again, see Which Throw is Best For Distance – Hyzer or Anhyzer for more on that.) But so many golf holes have roller impediments, for example:
- A creek or lake runs across the fairway
- The fairway has thick weeds or big rocks or very bumpy tree roots
- The fairway is too narrow just where a roller needs a wide arc before straightening up
Good hole designers strategically place obstacles that force you to calculate probabilities. To get your best distance, it’s critical to find not just a long route, but a long and safe route.
For example, the primary path might be straight ahead but the trees form a ceiling a little lower than you would prefer, challenging you to keep your shot below your ordinary optimal height. The alternate path might be a hyzer around a tree, more or less wide open, except that you might not reach it! So how do you choose?
You need to judge which shot has the highest probability of success for you and your disc and the current wind conditions. It’s possible that the straight shot under the trees will get closer to the hole, but it risks getting knocked down early. Distance isn’t always about power. It’s also about playing the probability of your drive succeeding along the line you choose.
Lower Body
Now let’s get to the techniques for your form. To throw far, the disc must go fast. It will go only as fast as your hand is moving at release, and that speed is the sum speed of your wrist, arm, shoulders, hips, and feet. Achieving good distance requires a lot of skill and athletic form and there is much more to it than just arm speed. In fact, the lower body is far more important to the end result.
- Some players use a “stand-still” stance for shots up to 200 feet where accuracy is key, but that certainly won’t work for long distance drives. To build momentum on long holes most players use a three- or five-step runup with an “x-step” as the second to last step.
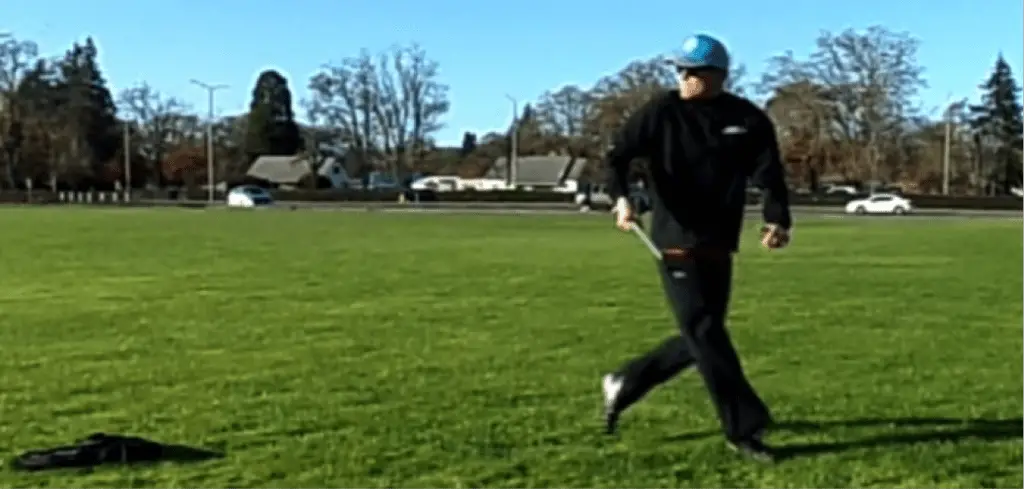
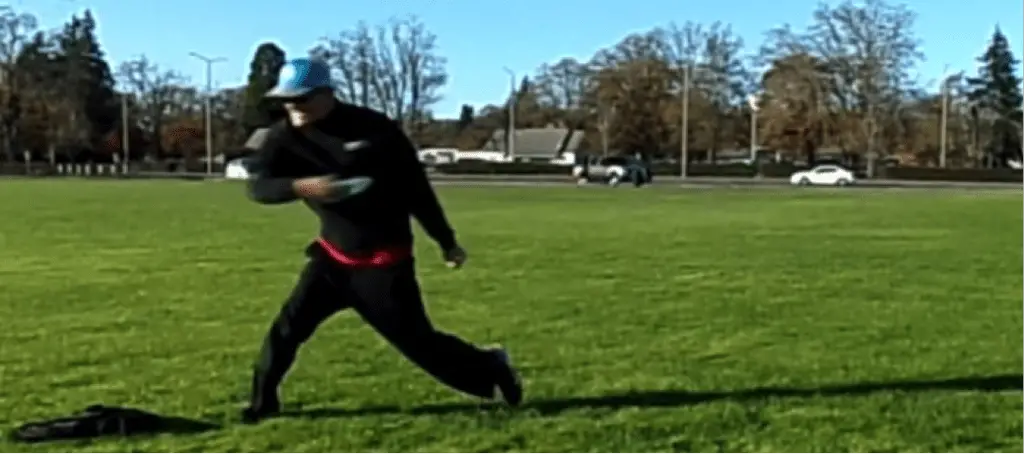
- Here I’ll describe the three-step runup because even if you do a longer runup, the last three steps will be the same. See the video capture sequence below showing steps 1, 2, and 3. The first step is with the right foot, with the toes pointing about 90 degrees sideways to the line of the tee pad and the direction you are throwing. For step 2, bring the left foot forward crossingbehindthe right foot. That’s the x-step (the second photo in the sequence). Then move the right foot forward with a large step, but it should not be pointing straight at the target! It should still point sideways like the first step you made with the right foot. Now the right foot is called the “plant foot” because it is planted on the ground and used as the pivot for the throw. Think of it as a pole that your body will spin around as you throw. You want the plant foot to be closer to the front left corner of tee pad, not the center. The reason for this is so that you can rotate your hips. That is extremely important! As the plant foot touches the ground, your disc should be at the maximum reachback point, with your right arm extended backward. Now all your weight should shift from the left foot to the right foot as you rotate your left hip toward the front of the tee pad while pulling the disc through and releasing. I’ll discuss the follow-through in a moment.
- A five-step runup can build more momentum, but the problem is that it requires 12-15 feet of space, which is longer than most tee pads. For this article, I did an experiment in an open field. I threw with a three-step runup which I know from experience fits on a tee pad that is eight feet long. Then I did a five-step runup starting from a little farther back. I estimated that I got at least ten percent more power into the throw with the five-step runup. That raises an important question.
Should you Start Your Run-Up from Behind the Tee Pad?
Some players don’t like the reduced power that comes with a three-step runup on an eight-foot tee pad, so they use an expanded runup consisting of one to four steps behind the tee pad before the final three steps on the tee pad, as described above.
A longer runup builds more body speed, but there are three critical challenges you must overcome if you want to do this.
- First, you must make sure you are comfortable making the transition step from off the tee pad to on it. Some tee pads might be raised or have an uneven surface behind them which makes that step difficult. No matter what you do it’s very important to be smooth, so carefully consider if you are comfortable with that giant transition step.
- Second, you have to practice throwing for hundreds of hours to make sure you are able to apply that extra body speed in a smooth throwing motion. For a beginning player, it can be difficult to control the disc when the arm and body are moving fast. So build up to it. When you are able to throw flat straight shots very well, then you can experiment with running faster.
- Third, what will you do if you become dependent on a five-step runup, say, and then you go to a tournament where there is literally no room behind the tee pad? What if your card mates or the gallery are crowded behind the tee pad? This could break your concentration. So if you do develop a long runup, be sure you can always revert to your tried and true three-step runup.
Upper Body
It’s impossible to have a conversation about distance throwing without someone bringing up the subject of reachback. This refers to extending (not stretching) your right arm backward, away from the target, just before you begin to shift all your weight forward to your plant foot and whip you arm forward. If you don’t reachback, your throwing hand will be trying to build up maximum speed from a shorter distance.
Some say reachback isn’t important, but most strong throwers have a great reachback because that gives them time and space to accelerate their hand. For example, it’s easier to accelerate a car from zero to sixty in six seconds than in three seconds, right?
Reachback is very important, but don’t overdo it. By this I mean, don’t try too hard to stretch your arm to maximum extent, or hold it there too long.
Study photos of top pros at the instant of their maximum reachback. Most of the time, they are dipping their head down, about 90 degrees away from the line to the target. Why do they look away from where they need to throw it? Because this allows the shoulders to rotate backward a little, just before the shoulders rotate forward during the throw. But notice that they do NOT look backward, 180 degrees away from the target.
Try to hold the disc flat, parallel to the ground, the whole time from the reachback point through the release point. If you don’t hold it flat, it means that you must twist your wrist during the arm swing to finally put the disc on your intended plane at the instant of release. But don’t you already have enough moving parts right now that you don’t need to be worrying about that? Keep it simple by holding the disc parallel to your intended surface plane of flight. So if you are throwing anhyzer, the edge of the disc away from your grip should be tipped toward you while you are running up. For hyzer, tip the opposite edge away as you reachback.
You have to practice reachback—a lot! And study videos of yourself.
The Power Pocket
Once you get a comfortable reachback, the next stage to focus on is the so-called power pocket. See thediagram showing the overhead view of the power pocket.
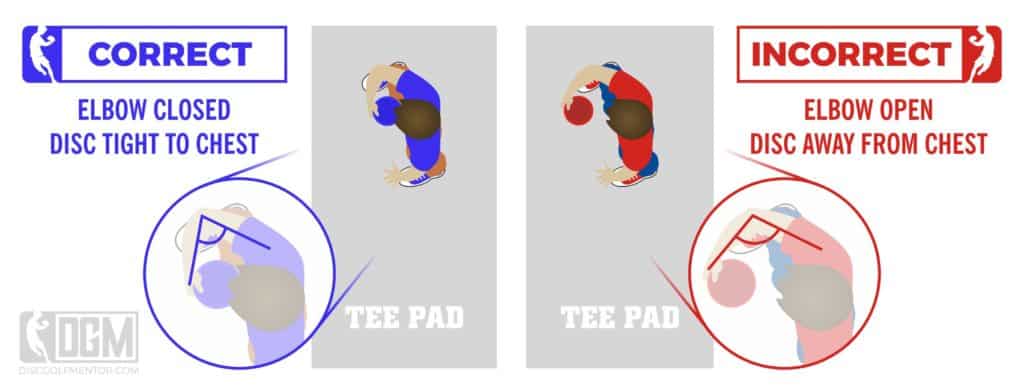
The power pocket is the rectangle formed by your shoulders on the bottom, your upper arm on the right side (front of the tee pad), and your lower arm parallel to your chest. The idea is that you want about a 90 degree angle between shoulders and upper arm, and another 90 degree angle at the elbow bend. Some beginning players start out by swinging the disc with their arm extended through the whole throw, tracing an arc. This is called “rounding”, and should be avoided (See the article on How To Fix Rounding if you’re struggling with this). Believe it or not, you get the most power by pulling the disc right in front of your chest, as if you are pulling a rope from the back of the tee pad straight through to the front of the tee pad. That requires bending your elbow at 90 degrees to form the power pocket.
There is a lot more going on with your shoulders, arm, and hand but it’s hard to put it in words. The best thing to do is to study videos of the pros, and of yourself. And did I mention, You have to keep practicing!
Follow-Through
You might think that the follow-through doesn’t add distance to your throw, but it does!
First, by continuing to rotate your left shoulder and hips to the right after the release, you are taking pressure off your leg muscles so that they won’t get strained. If you strain your muscles on an early hole in a long round, it will definitely reduce your driving distance on subsequent holes.
Second, your body knows what you are planning to do. If you don’t follow-through it means you are planning to stop suddenly. And that means your throwing motion will start slowing down too early. So go full power all the way through the release point and only then slow down with a natural follow-through.
Avoiding Grip Lock
If you are trying to throw hard, and worried about how important this shot is to your score, you may grip the disc a little tighter thinking it will help you throw farther. But what often happens is that you hold on a split second too long and the throw becomes a disaster zooming off ten or even thirty degrees to the right of your intended line to the target.
But even knowing this, you still might do it on occasion. My solution is to practice throwing hard in field work so you find your optimal grip tightness and then don’t ever change it! Also, when you practice in a field, try sprinting to your discs to gather them before throwing them back. This will make your heart beat faster and simulute the pressure you might feel when playing in a tournament.
Strength Training for Distance
To improve your throwing power, you should work on building up all your leg muscles, your gluteus maximus, your core, and your triceps. Regarding your arms, throwing a Frisbee mostly uses your triceps, not your biceps. So this means focus on push-ups or bench presses, as opposed to curls or pull-ups. I love doing pull-ups, and I’m not saying that it won’t help you get in shape and improve your distance. After all, pull-ups aren’t only for biceps but they also build shoulder strength.
The core is important because, geez, everybody knows it’s involved in every athletic movement. How can you rotate your hips faster if your core is out of shape?
Through the decades, many of the best distance throwers have had long arms. You may not be able to grow longer arms by eating more spinach, but I don’t think it will hurt to regularly stretch your arm muscles by hanging from a pull-up bar.
One last workout tip for distance. Try squeezing those v-shaped tension hand-grips whenever you can. That builds a stronger grip and forearm.
Scratched and Muddy Discs
Sooner or later we all throw in a creek. You probably carry a towel to dry off your disc during the round, but sometimes you don’t have time to do this before sticking it back in your bag. This means some mud could dry and get caked on.
Discs can also accumulate scratches from landing on rocks and pavement. Most manufacturers offer premium plastic discs that resist scratches better than standard plastic discs.
The point is that scratches and caked mud will eventually slow your disc down. The increased aerodynamic drag can make them turn over much sooner than you would like. For optimal distance, be sure to clean your discs and cycle them out when they are no longer in top condition.
Field Work
Now I can give you the most important tip (not a technique) to improve your distance. Are you ready? You must grow into your own style and the only way to do that is by making tens of thousands of practice throws. For most people, it’s difficult to improve rapidly by playing two rounds of golf every day. Think about it. When you play 18 holes, you are only making about one throw per minute (TPM).
To really get in your repetitions, you need to take a big bag of discs to a wide open field and throw by yourself for an hour, back and forth. Then you’ll be getting a TPM closer to nine or ten, which means thousands of extra throws over a period of weeks.
One reason this is so important is that you need to train your body to synchronize the timing of hundreds of muscle movements when you throw distance. When you start out, you probably aren’t timing your left hip rotation forward at exactly the right instant after your reachback. When you put in your field work, you will begin to develop a smoothness and coordination, and this in turn leads to greater distance. You can achieve even faster results if you video yourself and study it in slow motion on your computer.
Measuring Results
Whatever endeavor you embark on in life, you can’t truly improve at it without measuring performance before and after. In the case of disc golf, there are all kinds of statistics you can track, including circle-one putting percentage, OB shots per round, etc. If you are serious about improving your distance, you need to keep a log of your field work. Take a pencil and a little pad with you every day you go to the field. Jot down a header line and then a separate line for each stack. The header line should say three things:
- Date
- Estimated average wind speed for the session
- Weather conditions, temperature, rain
Now for each stack, you can start with practice and experimental throws, but save your best five discs for last and record the following for these:
- Is this stack downwind, crosswind, or into the wind?
- What is the speed number of these five discs?
- How many steps are in your runup?
- What grip?
- What is the best distance of these five? Pace it off, or use the Udisc app, or just estimate it from the landmarks on the side of the field (e.g. “finally got past third baseline”)
- How consistent was this stack? Score yourself from 1 to 5 where 5 means that all five discs were closely bunched; 4 means that one of the discs was significantly off target; etc.
After you get back from the field, enter the above data into a spreadsheet so you can collect it over time and even make eye-popping charts to show your spouse. I’m 100% confident you will eventually throw farther because if you don’t like what the spreadsheet is telling you, it will force you to experiment more and study your videos and keep practicing.
What is the Single Most Important Technique to Throwing Far?
I believe that getting good hip rotation is the most important aspect to throwing far. I agree with many pros who say that good form in the lower body is much more critical than having a strong upper body. In my opinion, if you concentrate on getting your left hip to spin forward just before you release your throw, then you will also naturally achieve proper foot work. So think about your hips, and it will guide you to good footwork and good throws.
Conclusion
This article covered a smorgasbord of ideas that I hope will help you achieve greater actual distance on the course. Some of these tips may contribute only a little to your distance, but all improvements in your throwing techniques and form are cumulative. Good luck smashing your drives, and don’t forget, putting is more important.
About the Author
Scott Zimmerman was the 1982 World Frisbee Golf Champion, multiple-time World Overall Frisbee Champion, and threw an Aerobie across Niagara Falls and set four distance world records. His book “Chasing Disc Golf and the Overall Title” is available now with extremely favorable reviews at amazon.com. See https://chasingdiscgolf.weebly.com/
