There are many reasons you could be losing power and distance in your drive, but one of the most common and perhaps more difficult to fix, is rounding. In this article, we’re going to cover what rounding is, what causes rounding and 5 simple steps you can take that fix rounding. We may even throw in a little extra information at the end for you, so stick around.
What we’re going to cover in this article:
- What is Rounding
- How to Fix Rounding
- Step 1: Offset Your Feet
- Step 2: Reach Out, Not Back
- Step 3: Close Your Elbow
- Step 4: Hand On The Outside
- Step 5: Slow It Down
- Form Tip: Film Yourself
- What Drills Fix Rounding?
- Grip-lock and Rounding
What Is Rounding
Chances are that you already know what rounding is, but for those of us that need a refresher, I’ll go into a little bit of detail describing exactly what rounding is and why its a problem.
Rounding in disc golf is when the player’s body get’s in the way of the disc as they throw. This cause the disc to travel around the body, creating a curved, or round, path. This usually happens when a player rotates their shoulders too early in their pull, causing their lead shoulder to close in tight to their body. This puts the disc too far behind their body and is the heart of the problem of rounding.
Now, rounding does all kinds of bad things to your shot. It robs you of power, and thereby, distance. It throws your aim way off, making your accuracy inconsistent and undependable. And perhaps worst of all, it’s just plain frustrating. Rounding is a difficult problem to fix because there are a few different things you could be doing that can cause rounding.
How To Fix Rounding
In this article we’re going to talk about 5 simple steps you can take that will help you to fix the form errors that cause rounding. It’s worth mentioning that if you’re rounding, you probably won’t be able to fix it over night. Correcting mistakes in form take a long time as the bad habits you have are now ingrained into your muscle memory. It takes repeated corrective action over a long time to change that muscle memory.
The best thing you can do is start slow and be consistent. Practice these 5 steps a few times a week along with some of the drills we mention below and you should start to see good progress fairly quickly.
Step 1: Offset Your Feet
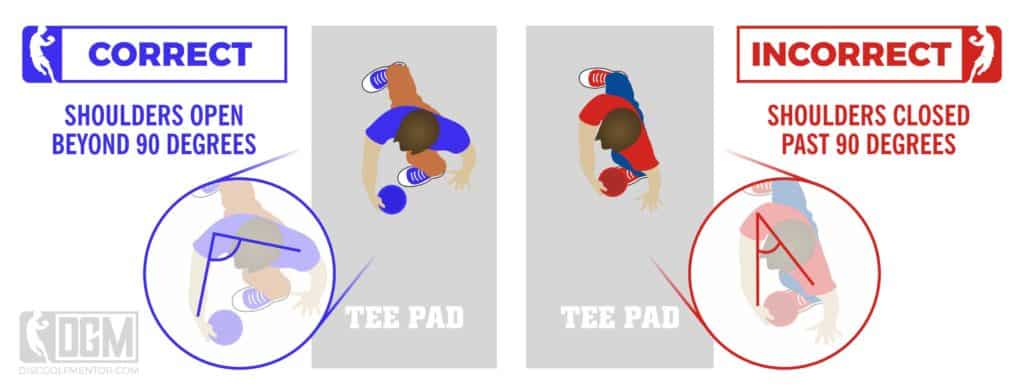
One of the main issues that can cause rounding is not turning your shoulders far enough during your reach back. If you don’t rotate your upper body far enough backwards in your reach back, your lead shoulder has to compensate by coming in too close to your chest in order to get the disc all the way back. This puts your body directly between the disc and your target, which causes rounding as you try to pull the disc through and it has to travel around your body to get out in front of you.
To help fix this problem, I recommend offsetting your feet. During the final step before you throw, your leading foot should be slightly in front of your back foot and turned slightly back. This allows your upper body to more naturally rotate backwards in the reach back which in turn allows you to keep your leading shoulder at a proper 90 degree angle.
As you pull the disc through, focus on keeping your leading shoulder at 90 degrees or greater to your chest, which should keep the disc on a straight line all the way through the shot.

Step 2: Reach Out, Not Back
The term “Reach Back” is slowly growing out of favor for some players as they realize that it’s a misleading term. As you rotate your upper body to face backwards, if you “Reach Back”, you’re reaching the disc back behind you and off the line of play. When you’re in this position, you should be reaching out instead, which keeps the disc in line with your target.
Take a look at most professional disc golfers. If you pause a replay just as they’re in their full reach back position, you’ll notice that they’re leading shoulder isn’t closed, it’s open, and they’re reaching the disc straight out behind them, not back behind their body.
It feels strange at first, but I’d like you to try reaching out as you turn your body instead of reaching back. The key is to have your disc follow a straight path from reach back (or reach out) position, to release point. So as you reach out in your back swing, make sure that your disc is traveling in a straight line back, then a straight line forward as you pull through.
Step 3: Close Your Elbow
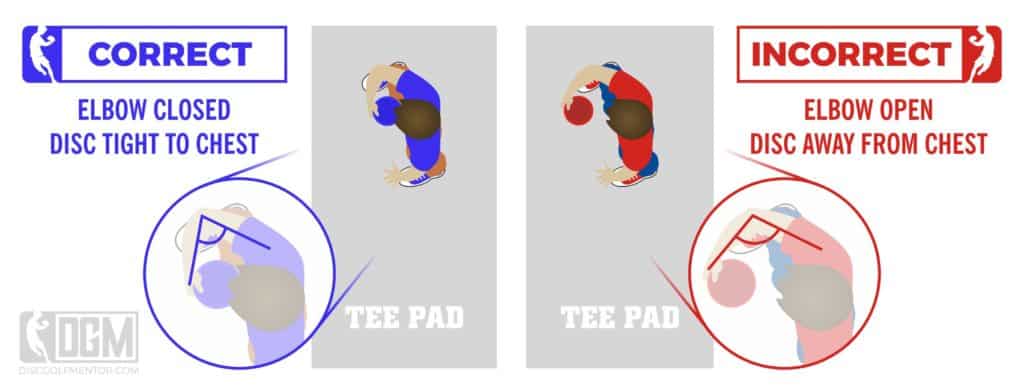
Now that you’re focusing on keeping your leading shoulder open (past 90 degrees), you may find that your disc is further away from your body as you begin to turn and pull through. This is actually a good thing. That means you’re making progress at fixing the form of your shoulder. The next thing to work on is keeping the disc from pulling through too far away from your chest.
You want your disc as close to your chest as possible as you pull through, but some players find that their disc is too far from their body. To correct this, you need to close your leading elbow as you pull through. This keeps your shoulder open, but brings the disc in close to your chest creating a shape that looks a bit like a pocket with your arm. There’s a name for this. It’s called the power pocket and was coined by Jason over at heavydisc.com.
Developing and utilizing the power pocket in your form is a huge advantage for disc golfers, and a big part of that development is creating that pocket by keeping the shoulder open and closing your elbow as your pull through.
As with every step on this list, you’ll want to adjust the amount that you close your elbow so that the disc always follows a straight line as you pull through nice and tight to your chest.
Step 4: Hand On The Outside
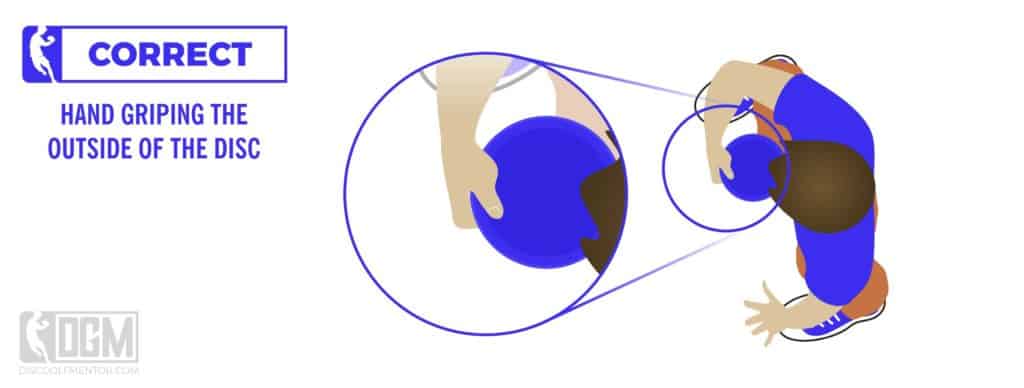
This one’s all about proper form as you pull through. Your hand should be on the outside of the disc with your wrist loose, but straight. This allows you to keep the disc close to your chest as you pull through, which keeps the disc on a straight line.
If your hand is in the wrong position on the disc, or if your wrist is cocked one way or the other, that could change the angle of the disc, or throw the disc off the line of play, which attributes to rounding and other form problems, like releasing the disc nose up.
Keeping the hand on the outside also helps to create a nice whip-like effect as you pull all the way through your shot. This motion generates a lot of power and adds really good distance to your shot.
Power Grip Breakdown
I’ve done a breakdown of all the grips in this guide, and they’re all free to watch. Use the link below to get to all the videos.
Step 5: Slow It Down
You should be practicing steps 1 through 4 regularly at a slow pace. Start at a quarter speed and pause as you go to make sure you’re pulling through on a straight line with the disc. If the disc ever deviates from that line, you’re rounding and you need to make an adjustment.
A good way to do this is to put something straight down on the ground, then practice your form over the object so that the shadow of the disc travels along the straight object. If they shadow of the disc deviates from the straight line, make your adjustments.
As you get more comfortable with the adjustments you’re making in your form, slowly add speed until you can perform the entire sequence with the disc never once deviating from a straight line.
Form Tip: Film Yourself
One of the best ways to check your form and see if you’re rounding is to film yourself. I find that the best way to do this is to set up your phone (or camera) on a table and record yourself from directly behind you. This allows you to see if the disc travels left or right as you pull through. Ideally, the disc should stay completely stationary up until the moment the disc would be released. Wherever it moves left or right are the areas you need to adjust.
What Drills Fix Rounding?
One of the best ways to fix rounding is to practice pulling in a straight line with your disk. A great way to guarantee the correct motion is to use a wall as an aide. This brings us to the wall drill.
The Wall Drill
The wall drill is a great drill to practice if you’re having rounding problems. Start by lining up your leading foot, your plant foot, perpendicular to a wall about 3 inches from touching. Then, line up the toe of your back foot with the heal of your leading foot. Now take a disc in your hand and go through the motion of reaching back and pulling through as if you’re throwing a disc.
Your forearm should be almost touching the wall all the way through the drill, keeping the disc following a straight line. If your disc ever deviates from that line, your arm will come away from the wall which tells you exactly where you need a correction.
This is a great drill to practice as it forces you to keep the disc along a straight line. The more you practice the wall drill, the more familiar you will become with the correct form needed to pull in a straight line.
Please be careful as you perform this drill. You should be moving very slowly, especially at first, as you can scrape up your arm pretty good on the wall as you bring your arm through. Also, watch out for things like light switches and picture frames. They can really mess up your day if you hit one too hard with your elbow.
Grip-Lock and Rounding
Grip-lock in disc golf is when you hold the disc too tightly, causing a late release, which in turn causes your disc to fly anhyzer and turn over. It’s also a huge misconception.
There is no such thing as grip-lock. At least, not in the way you think it is. When a late release causes your disc to go anhyzer, the problem isn’t grip-lock. The problem is that you’re rounding. I’ll explain.
When you pull in a straight line all the way through your shot, an early or late release doesn’t matter. You’re still releasing on a straight line, so your disc will always follow the same trajectory, regardless of when you release. When you’re rounding on the other hand, a late or early release changes the entire aim of the shot.
This is why some people call a late release grip-lock. Because when you’re rounding and you release too late, your disc flies anhyzer. I encourage you to recognize this as a rounding issue instead of a release timing issue. If you work on your rounding problem, the release fixes itself.
Wrapping Up
In this article we’ve covered the definition of rounding in disc golf, why it’s bad, and 5 simple steps you can take to fix your rounding issues. We also covered a really great drill that helps to remedy rounding problems and the misconception of the term grip-lock.
I hope you’ve learned a few things and that you’re excited to get out there and work on fixing any rounding issues you might have with your form. Be sure to check out some of the other great articles we have on the site for more tips and tricks to help you throw farther and play better!
