Top Tips for Intermediate Disc Golfers:
- Utilize the Power Pocket
- Correct Rounding Issues
- Perfect the X-Step
- Learn Hyzer and Anhyzer
- Refine Your Shot Selection
- Practice Your Scramble
- Keep The Nose Down
- Don’t ‘Go For It’
- Don’t Forget The Basics
- Don’t Forget To Have Fun (even when you’re not!)
Disc golf is a tricky sport and the more you learn, the more you may start reaching out for new things to try or new advice you haven’t heard in order to reach the next level of play. That’s why I’ve written this article. To share my best disc golf tips for intermediate level players who are looking to step up their game even further.
In order to do that, you need to be good enough to learn to identify what you’re doing wrong. That is the key to development. You can only improve on the things you do poorly, when you know what those things are.
So in this article, I’ll be teaching you the key tips to pushing your game to the next level. If you take the information I’m giving you and practice these tips as you play, you should be able to throw farther, straighter and with a higher degree of accuracy and consistency.
I can say from experience that these tips really do work! When I was learning all of this, my max distance drive went from 290 feet to 423 feet. I’m also throwing straighter than ever, with better accuracy, and making much better shot selections. I feel confident that if you learn and practice these tips, you’ll see similar results! Let’s jump in.
Utilize the Power Pocket
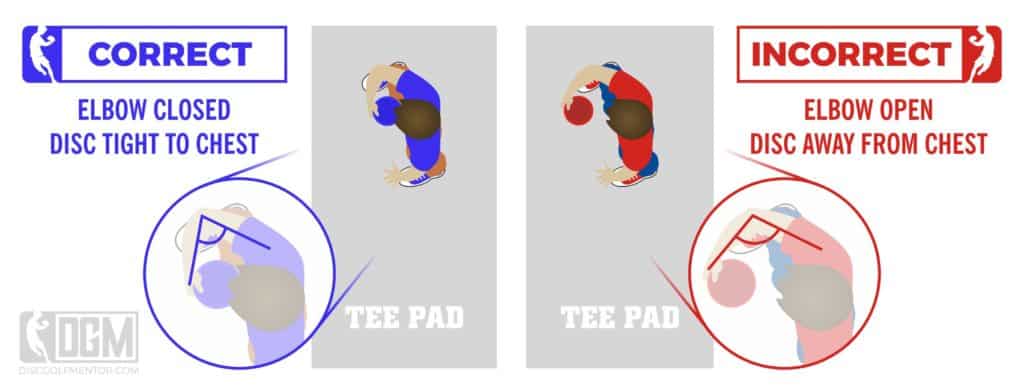
The first tip for intermediate players is to utilize the power pocket. The power pocket is a term used to describe the moment the disc passes your right pectoral muscle (when throwing right handed with a backhand throw). With the disc in this position and your hand on the outside of your disc, your arm creates the shape of a pocket with the disc nested inside of it. This is the moment of highest potential energy in your swing.
In layman’s terms, the better the pocket, the more power is transferred into your disc.
For maximum energy potential, your disc should be as close to your body as possible when it crosses your right pec. Your elbow should be elevated, and your hand should be on the outside of the disc. As you extend from this position, your arm acts as a whip and your disc should literally rip out of your grip with the amount of force being applied to it. A good example of the correct positioning of the disc is shown in the image below.
Utilizing the power pocket correctly can be difficult to get right, but once you do, you should see enormous gains in distance due to the extra power. Focus on the motion as you practice and pause as the disc crosses your chest to make sure that you hand is on the outside of the disc and that your disc is as close to your chest as possible. This is how to create the pocket.
Jason over at HeavyDisc.com first coined the term power pocket and has some really great information on his website about the correct form. The video below shows Jason throwing a few discs while utilizing the power pocket. I high recommend watching this video and the other video’s he’s put out on youtube.
Correct Rounding Issues
Rounding is a huge problem for both beginner and intermediate players. Ideally, during your throw, the disc should travel in a straight line from reach back to release. There’s two main reasons for this.
- Accuracy. The best way to aim is in a straight line.
- Power. You can generate the most power if you don’t deviate from your line.
Rounding is when the disc deviates from that straight line and follows a curved path during your throw instead. This reduces momentum, and kills any chance of throwing a really long, accurate throw.
From here you should check to see if you have rounding issues and if so, work to correct them. How do we do that? Lucky for us, rounding is easy to identify. There are two main causes of rounding and we can go over them now. First, take a look at the image below.
The Closed Shoulder
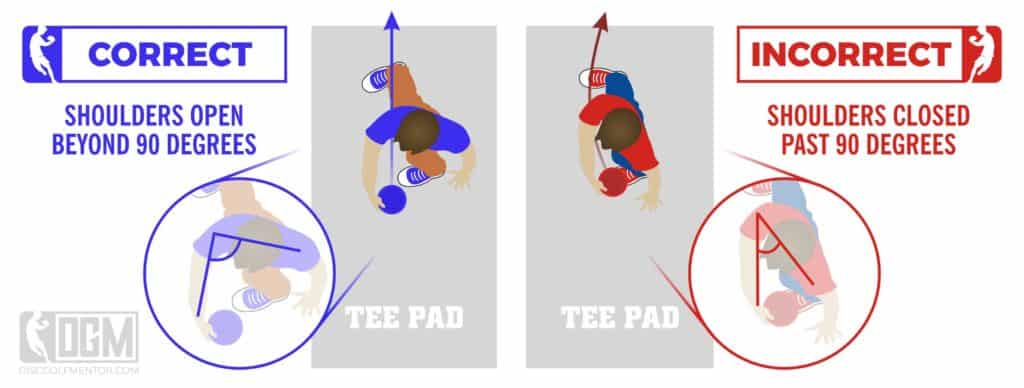
Before we talk about how to fix rounding, let’s figure out if you’re doing it. The best way to do that is to check your shoulder angle. When you reach back, your shoulder should never go past 90 degrees. Take a look at the image above. See the player on the right? His shoulder is completely closed and his bicep is really close to his chest.
This is the root of the rounding issue. When your arm is this close to your body, the disc has no other option but to travel in an arc to get around your body. This curved path is what takes away some of your momentum and a lot of the accuracy of your throw.
How To Fix It
There are two key changes in your form that you need to take to fix rounding, and I warn you, they feel a little strange at first. Stick with it, practice the movements and they’ll become natural over time.
Rotate You Upper Body More
The first key to fixing rounding is to rotate your upper body more and open up your chest so that your shoulder can remain open as you reach the disc back. Take a look at the player on the left in the image above. His upper body is turned quite a lot more and this allows his shoulder to remain open.
It’s not a “Reach Back”
The Reach Back portion of your throw is the part where you reach the disc back… It’s not rocket science, BUT it is very misleading and creates the bad habit among disc golfers to reach the disc back behind your body. This is part of what creates the closed shoulder problem.
The second key to fixing rounding is to change your vernacular. Instead of a “reach back”, you should think of it as a “reach out”. Try this: Stand up with your feet spread apart and reach straight out in front of you with your throwing arm. Right now, your shoulder is at a 90 degree angle. Now twist your upper body but keep your shoulder stuck at 90 degrees. Keep going until your in a throwing position. This is the correct throwing position. Upper body rotated back and arm out at 90 degrees. See the image above for reference.
You should now be able to start rotating back while keeping your shoulder open. Close your elbow to keep the disc in close to your chest and follow through to release. You’re disc should now be able to follow a completely straight path.
This straight path corrects rounding issues and allows you to be much more accurate, and put a lot more power into the disc when you throw. For reference on the correct positioning, check out the guy in the blue shirt in the image above.
I also have a whole lot more information about rounding and the nitty gritty of fixing it in this article: How to Fix Rounding in 5 Simple Steps
Perfect the X-Step
At the intermediate level, you should already know or be working to perfect the X-step. For those of you who aren’t familiar with the term, the X-Step is a specific style of run up that most disc golf players use to increase the power, speed and accuracy of a disc golf throw.
The benefits of the X-Step come from the way it forces you to move. The X-Step puts your feet in the best position to stay balanced as you shift your weight and spin your body to generate power into your disc.
Timing is also a nice benefit to the X-Step. By practicing the X-Step and performing it the same way every time, you’ll develop really nice timing in your reach back and release.
Seeing the X-Step in action is really the best way to learn the motions and benefits of the move, and one of the best videos I’ve come across showing the X-Step is by Danny Lindahl. I’ll embed the video below so you can take a look.
Learn Hyzer and Anhyzer
When you feel like you’re at the intermediate level, it’s now time to start experimenting with hyzer and anhyzer.
If you’re new to the terms, hyzer and anhyzer are release angles that change the way your disc flies. Putting a hyzer angle on your disc will force it to fly more overstable while putting an anhyzer angle on your disc will force it to fly more understable.
Mastering these two types of shots adds new levels to your ability on the course. You’ll be able to manipulate the flight path of your discs to fit almost any tricky situation and you should start to see new paths to the basket that you hadn’t considered before.
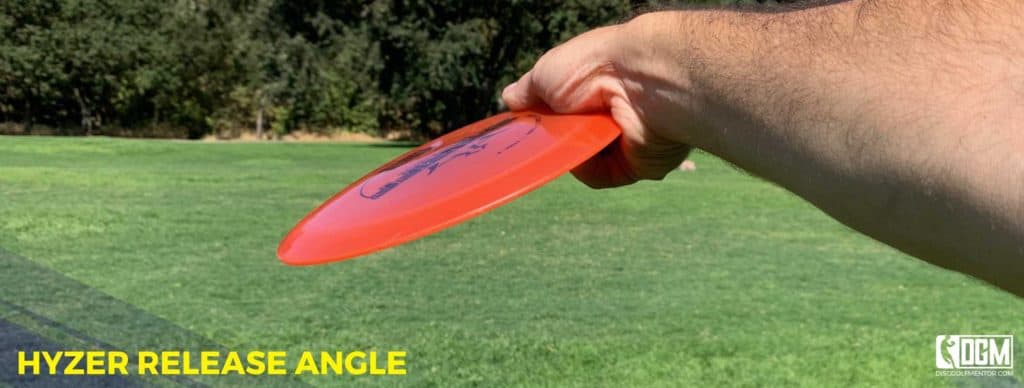
Hyzer
To throw a hyzer shot, tilt slightly at the waist so that your leaning slightly forward and over your disc. Keep this tilt as you move through your shot and release the disc. Note that your grip on the disc or the angle of your wrist shouldn’t change. It’s the tilt of your waist that creates the angle.
Keep in mind that throwing hyzer forces your disc to fly more overstable. That means that when throwing RHBH, your disc will fly in an arc to the left. The more hyzer you put on the disc, the more curve you’ll get out of it.
This is great for getting around trees or other obstacles like mandos on the course. It’s also really nice for skip shots. I find that if I put a nice amount of hyzer and a lot of spin on an overstable disc, I will get a nice big skip out of it.
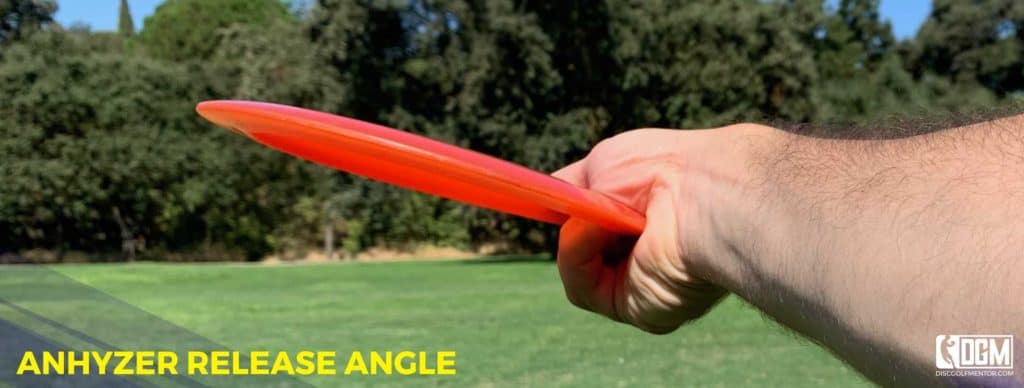
Anhyzer
Anhyzer is more tricky for most players but ultimately, much more valuable. To throw anhyzer, tilt back slightly as you throw and be sure to follow through in a downward motion. This should be very slight as most stable discs, and especially understable discs, don’t need much coaxing to fly anhyzer.
The anhyzer angle will force your disc to fly understable, which can be a huge benefit for players that have a hard time throwing forehand shots as most backhand only players can’t throw the disc with a right curve. Throwing anhyzer allows you to do this.
Anhyzer is also the preferred way to throw roller shots. You’ll want to start with a very flippy, beat in disc, or a very understable disc and put a lot of anhyzer on it as you throw. Play with the height as you practice and you’ll find that the disc will flip all the way to a vertical position then roll on the ground.
I have a lot more information on how to throw a roller here: Step by Step Guide to Throwing The Perfect Roller
Refine Your Shot Selection
Most beginners are so focused on just getting the disc down the course that they don’t take advantage of choosing the right shot for your lie. This is where really good players shine. It’s not always about throwing at the perfect angle or throwing as far as you possible can. It’s about picking the shot that best fits your situation.
If I could pick one thing for you to take from this article it would be this point. Before you throw, stop for a second and think about where you are. Think about the obstacles in your path and think about the best way to approach the basket.
Quite often, just taking a moment to think will save you a stroke or three on the hole. Think about what types of shots you’re good at and think about how you could apply those shots in this situation. Think about your approach. Think about how hard you really need to throw to get to where you want to be. Think about your next shot and where you want to throw that shot from. That will give you a target for the shot you’re throwing now.
I guarantee the pros are thinking all of this and more as they play through the course and to step up your game and better your scores, you should be thinking these things too!
Practice Your Scramble
Even the best laid plans go awry, and quite often, our discs don’t fly the way we intend them to. This is when we scramble.
Scramble is a term used to describe the act of getting out of a troublesome lie. When you’ve thrown off course, or into a messy spot, you need to scramble to get out of it.
Some players shine in these situations and other fail miserably. If you’ve got really good scramble game, you should be able to work yourself out of almost any situation without scoring too many extra strokes. If your scramble game is weak, having a bad lie can easily put you into bogie or double and triple bogie territory.
This is why working on your scramble game is so important. It allows you to save your score even in you have a few terrible shots along the way. When you find yourself in a bad lie, use it as an opportunity to practice your scramble game. Think about the best way to get out of your bad situation in a way that will allow you to still score par.
If you think of it this way, pretty soon you’ll be well versed in how to get out of tricky situations while keeping up with your buddies in score.
Keep The Nose Down
Throwing nose down is a subtle but important tip and we should really cover what throwing nose up does to your disc first.
Think of a plane coming in to land. What does the plane do to slow down? The nose of the plane tilts upwards right? This puts a greater amount of resistance on the wings of the plane creating more drag and slowing it down.
Well, the same thing happens when you throw your disc with the nose tilted upwards. More of the disc is exposed to the air rushing past and it slows the disc down. This robs your disc of much of it’s flight potential, meaning you won’t throw as far and often, the flight path of the disc will change.
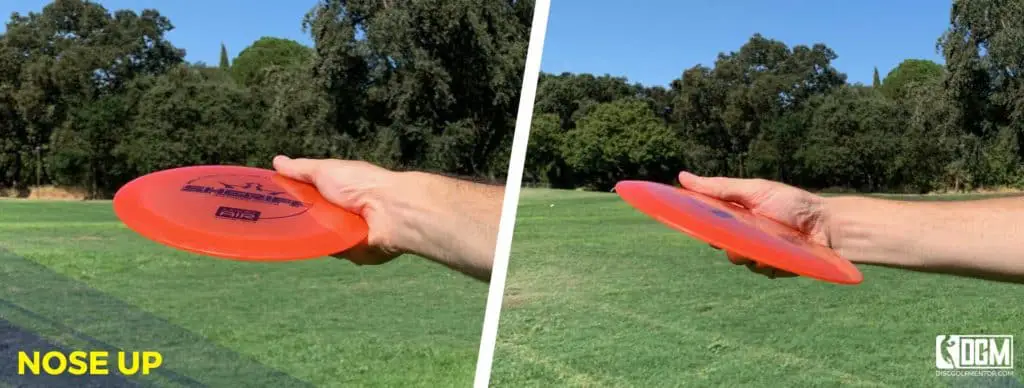
To combat this, you should be throwing “nose down”, which essentially means the disc should be flat in relation to it’s flight path. Keep in mind, this doesn’t mean flat in relation to the ground. You can still aim your disc upwards, but the disc should be flat to the angle you’re throwing it on.
Throwing nose down reduces air resistance and allows you to get the maximum amount of flight potential out of your disc. You’ll find that the disc does’t just lose energy and die. It should fly with momentum throughout it’s entire flight path.
If you find that you’re throwing nose up, try tilting your wrist forward slightly. This should bring the nose down. Also, I find that the closer my thumb is to the outside of the disc, the more flat it flies. As I move my thumb inwards, my discs tend to fly more nose up. So experiment with thumb positioning to find the perfect angle.
Don’t Forget The Basics
Sometimes we get so caught up in the weeds of some of the more advanced disc golf techniques that we forget to be consistent with the basics. It’s still important to practice and focus on the simple things as you play. Always keep that in mind.
Putting is one of the most important areas of disc golf and unfortunately it’s one of the easiest areas to grow weak in. A simple putt gone wrong can easily add a stroke to your score, or worse, consistently missing relatively simple putts is a sure fire way to score poorly on the course. Don’t forget to practice your putting often so that you can rely on your putt when you need it.
Another thing a lot of intermediate players forget about is the mid game. It’s so easy to practice fancy shots or max distance drives, but if you can’t throw a midrange, it’s very likely you won’t score well.
Take some time to focus and practice your mid range shots as well. Having a nice mid range shot can allow you to position yourself for an easy putt or a nice follow up shot to the basket, and can often save you if you’ve had a bad tee shot.
Don’t ‘Go For It’
The basket’s right there! Just barely out of comfortable putting range, and I know there’s a cliff just past the basket….. BUT if I make it, it’s Birdie time! I’m going to go for it!
Does this inner monologue sound familiar? It should! I know you’ve done it! Gone for that shot you shouldn’t have in the hopes of a miracle shot, but it very rarely turns out that way and most of the time you’ll end up scoring more strokes than you would have if you’d just laid up and taken the easy putt.
The trick is to train yourself not to take those shots and realize the reason you’re in that situation to begin with. Realize that you don’t want to be in that position where you have to chose to take the death putt or lay up. Plan for that and aim to be in a different spot next time.
THIS time however, don’t feel like you NEED to take that risky shot in order to catch up. Take the safe shot, and catch up on the next hole by making really good shot selections and executing your plan.
Don’t Forget To Have Fun
Lastly, and possibly the most import tip on this list to have fun playing disc golf. It seems simple but as we get better at the game, we often put too much importance on our score or how well we’re performing. Keep in mind that disc golf is a game first, and the reason we all got into this sport to begin with is to have fun with our friends.
It’s easy to forget this if you’re having an off day and your shots aren’t flying the way they should. If you’re throwing poorly and maybe you’re not scoring as well as you’d like to, it’s quite easy to get mad and upset.
I know it’s hard, but pause, take a deep breath and try to shake it off. Smile and laugh about it if you can. It really is just a game and if you’re not having fun, you’re not playing it right. My last tip for you is to enjoy the time you spend with your friends and the camaraderie you share first, and the competition of the game second.
Get out there and play to have fun. That’s what it’s all about!